Tutorial — xcodex
Schritt-für-Schritt-Anleitung für iOS-, iPadOS- und macOS-Entwickler.
1. Was ist xcodex?
xcodex ist ein terminalbasiertes CLI-Tool für Apple-Entwickler. Es fasst die wichtigsten Xcode-Workflows in einer einzigen, tastaturgesteuerten Oberfläche zusammen — ohne Flags auswendig zu lernen, ohne Kontextwechsel, ohne Xcode öffnen zu müssen.
Das Tool unterstützt iOS-, iPadOS- und macOS-Projekte und deckt den gesamten Entwicklungsalltag ab: Build, Tests, Simulatorsteuerung, Geräteverwaltung, Archive, TestFlight/App-Store-Auslieferung, Lokalisierung, Code Coverage, Crash-Analyse und Projektpflege.
Tutorial als PDF
Dieses Tutorial als PDF in der aktuell ausgewählten Sprache herunterladen — zum Offline-Lesen, Drucken oder Archivieren.
Tutorial als PDF speichernxcodex herunterladen
Das notarisierte xcodex.pkg Installationspaket kannst du direkt herunterladen. Öffne das Paket, führe die Installation durch — xcodex liegt danach unter /usr/local/bin/xcodex. Setz einen Shell-Alias und starte xcodex direkt.
2. Voraussetzungen
| Voraussetzung | Hinweis | Download |
|---|---|---|
| Xcode | ~30 GB, einmal öffnen zum Einrichten der Komponenten |
App Store ↗ developer.apple.com ↗ |
| Xcode Command Line Tools | Enthält Git, xcodebuild, clang, make, svn |
Download ↗xcode-select --install
|
| Homebrew (optional) | Für CocoaPods und weitere Tools | brew.sh ↗/bin/bash -c "$(curl -fsSL https://raw.githubusercontent.com/Homebrew/install/HEAD/install.sh)" |
| CocoaPods (optional) | Nur wenn das Projekt CocoaPods nutzt | brew install cocoapods |
| Carthage (optional) | Nur wenn das Projekt Carthage nutzt | brew install carthage |
| xcbeautify (optional) | Für lesbare Build-Ausgaben | brew install xcbeautify |
| xcodes CLI (optional) | Für die Verwaltung von Xcode Versionen | github.com/XcodesOrg/xcodes ↗brew install xcodesorg/made/xcodes |
3. Installation
Es gibt zwei Möglichkeiten, xcodex zu installieren:
- Git-Repository — vollständiger Quellcode, Updates einfach per
git pull - Installationspaket — notarisierte xcodex.pkg direkt herunterladen und per Installer einrichten
1) Git-Repository
1.1) Repository klonen
Dieser Befehl lädt den gesamten Quellcode von xcodex auf deinen Mac herunter. Git erstellt dabei das Verzeichnis ~/Developer/xcodex mit allen Dateien. Du benötigst Git, um Updates später einfach per git pull einzuspielen, ohne das Tool erneut manuell herunterzuladen.
git clone https://github.com/drapatzc/xcodex.git ~/Developer/xcodex1.2) Ausführungsrechte setzen
macOS erlaubt standardmäßig nicht das direkte Ausführen von heruntergeladenen Dateien. Mit chmod +x gibst du dem Betriebssystem die Erlaubnis, die Datei xcodex als Programm zu starten. Dieser Schritt muss nur einmalig nach dem Klonen durchgeführt werden.
chmod +x ~/Developer/xcodex/xcodex1.3) Shell-Alias einrichten (empfohlen)
Ein Shell-Alias sorgt dafür, dass du xcodex aus jedem beliebigen Verzeichnis starten kannst — ohne den vollständigen Pfad eintippen zu müssen. Der Alias wird dauerhaft in der Konfigurationsdatei deiner Shell gespeichert und ist ab dem nächsten Terminal-Start automatisch verfügbar.
echo 'alias xcodex="$HOME/Developer/xcodex/xcodex"' >> ~/.zshrc
source ~/.zshrc
echo 'alias xcodex="$HOME/Developer/xcodex/xcodex"' >> ~/.bash_profile
source ~/.bash_profilealias xcodex="$HOME/Developer/xcodex/xcodex"
funcsave xcodexecho $SHELL ausführen. Die Ausgabe zeigt den Pfad zur aktiven Shell — z. B. /bin/zsh, /bin/bash oder /usr/local/bin/fish.
1.4) Ausführen
Wechsle in das Wurzelverzeichnis deines Xcode-Projekts und starte xcodex. Beim ersten Start musst du dein Projekt oder Workspace manuell auswählen, damit das Tool alle nötigen Informationen erhält — Schema, Gerät und Konfiguration. Nur so kann xcodex deine App korrekt bauen und testen.
cd YourXcodeProject
xcodex
1.5) Aktualisieren
Mit git pull lädt Git die neuesten Änderungen aus dem Repository herunter und wendet sie auf deine lokale Kopie an. So bleibst du immer auf dem aktuellen Stand, ohne xcodex erneut klonen zu müssen.
cd ~/Developer/xcodex
git pull
2) Installationspaket
Das notarisierte xcodex.pkg Installationspaket kannst du direkt herunterladen. Apple hat die Datei geprüft und freigegeben, sodass sie den Sicherheitsanforderungen von macOS entspricht und ohne Warnmeldungen öffnet. Öffne das Paket und führe die Installation durch — xcodex wird automatisch nach /usr/local/bin/xcodex kopiert. Setz danach einen Shell-Alias und starte xcodex sofort. Updates spielst du ein, indem du die neue Version herunterlädst und das Installationspaket erneut ausführst.
4. Die Menü-Oberfläche
Die Oberfläche ist zweigeteilt: links die Befehlsgruppen, rechts die zugehörigen Aktionen. Navigation erfolgt ausschließlich per Tastatur.
Am unteren Rand befindet sich eine Hotkey-Leiste mit 9 Schnellzugriffsbefehlen. Die zugehörigen Einträge in der Befehlsliste sind mit 1 bis 9 gekennzeichnet und lassen sich direkt über die entsprechende Zifferntaste aufrufen — ohne erst zur Gruppe navigieren zu müssen.
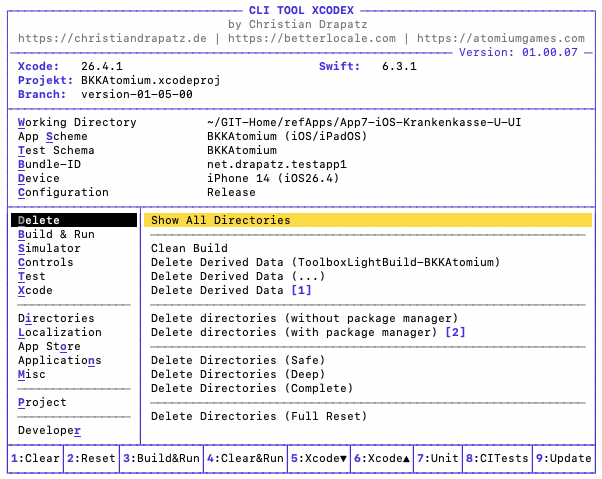
Split-Pane-Interface: Befehlsgruppen links, Aktionen rechts
| Taste | Aktion |
|---|---|
| ↑ / ↓ | Innerhalb einer Spalte navigieren |
| ← / → | Zwischen Gruppen und Aktionen wechseln |
| ↵ | Aktion ausführen |
| H | Kontexthilfe zur aktuellen Aktion anzeigen |
| X | Zurück zum Menü |
| Shift+Q | Programm beenden |
| 1–9 | Direktzugriff auf Hotkeys in der Leiste unten |
| Shift+<Buchstabe> | Befehlsgruppe direkt anspringen |
| L | Sprache der Oberfläche umschalten |
| Space | Zwischen XCode-Ansicht und Browser-Ansicht wechseln |
| Shift+A | Browser-Ansicht direkt im Arbeitsverzeichnis öffnen |
| Shift+W | Direkt zur Browser-Ansicht springen |
Alle Einstellungen bleiben automatisch zwischen den Sitzungen erhalten.
| Hotkey | Befehl | Beschreibung |
|---|---|---|
| 1 | DerivedData löschen | Entfernt den DerivedData-Ordner des Projekts und erzwingt einen sauberen Rebuild |
| 2 | Alle Caches löschen | Löscht DerivedData, Module-Cache und Package-Manager-Caches (SPM, CocoaPods, Carthage) |
| 3 | Build & Run | Baut die App und startet sie direkt auf dem aktiven Gerät (Simulator, physisches Gerät oder Mac) |
| 4 | Quick Reset & Build | Löscht DerivedData des Projekts, baut neu und startet die App — schneller Weg bei hartnäckigen Build-Fehlern |
| 5 | Xcode schließen | Beendet Xcode, ohne den Terminal-Fokus zu verlieren |
| 6 | Projekt in Xcode öffnen | Öffnet das aktive Projekt direkt in Xcode |
| 7 | Unit-Tests ausführen | Startet den Unit-Test-Durchlauf mit dem konfigurierten Test-Schema |
| 8 | Automatisierte Tests | Öffnet das Menü für automatisierte und kombinierte Testläufe |
| 9 | Projekt aktualisieren | Löst ein Projekt-Update aus (z. B. Abhängigkeiten neu auflösen) |
5. Erste Schritte — Projekt einrichten
Bevor du deine App auf einem Simulator oder echten Gerät bauen oder testen kannst, musst du xcodex einmal konfigurieren.
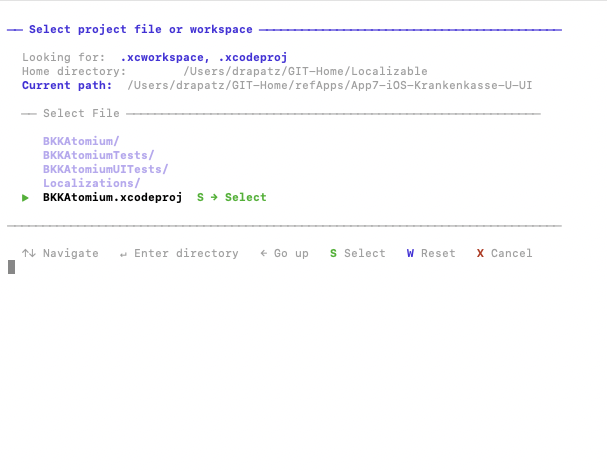
Schritt-für-Schritt: Projekt auswählen, Schema, Gerät und Konfiguration festlegen
Schritt 1 — Arbeitsverzeichnis auswählen
Im Hauptmenü drückst du A. Es öffnet sich der Datei-Browser, in dem du dein Xcode-Projekt (.xcodeproj) oder Workspace (.xcworkspace) auswählst.
Mit S bestätigst du die Auswahl. Anschließend wirst du gefragt, ob der Xcode-Cache (DerivedData) gelöscht werden soll. Optional werden danach auch die Abhängigkeiten neu aufgelöst.
Schritt 2 — App-Schema festlegen
Jetzt wählst du das App-Schema aus. Das Schema bestimmt, was gebaut wird und wie die App gestartet wird.
Schritt 3 — Test-Schema oder Testplan festlegen
Falls vorhanden, kannst du ein separates Test-Schema oder einen Testplan auswählen. Das ist sinnvoll, wenn deine Tests in einem eigenen Target oder über Testpläne organisiert sind.
Schritt 4 — Zielgerät auswählen
Als Nächstes wählst du das Gerät aus, auf dem gebaut oder getestet werden soll. Verfügbare Simulatoren sowie angeschlossene physische Geräte werden automatisch aus deiner Xcode-Installation erkannt.
Schritt 5 — Build-Konfiguration wählen
- Debug — für die tägliche Entwicklung mit Logs und Debug-Informationen
- Release — für optimierte Builds, z. B. für den App Store
Danach ist alles eingerichtet und du kannst direkt mit Build, Tests und weiteren Funktionen in xcodex starten.
Schnell-Shortcuts im Header
Im Hauptmenü sind im Header zusätzliche Einzel-Tastenkürzel aktiv, die den Konfigurationsfluss beschleunigen:
| Taste | Funktion |
|---|---|
| A | Arbeitsverzeichnis wählen |
| S | App-Schema auswählen |
| T | Test-Ziel auswählen |
| G | Zielgerät auswählen |
| K | Build-Konfiguration wechseln (Debug / Release) |
| B | Bundle ID anzeigen und kopieren |
| L | Sprache der Oberfläche umschalten (Deutsch / Englisch) |
6. XCode-Ansicht vs. Browser-Ansicht
xcodex hat zwei Hauptansichten: die XCode-Ansicht mit allen Entwickler-Werkzeugen und die Browser-Ansicht — ein tastaturgesteuerter Datei-Browser. Kein Kontextwechsel, keine Maus, kein Fensterwechsel.
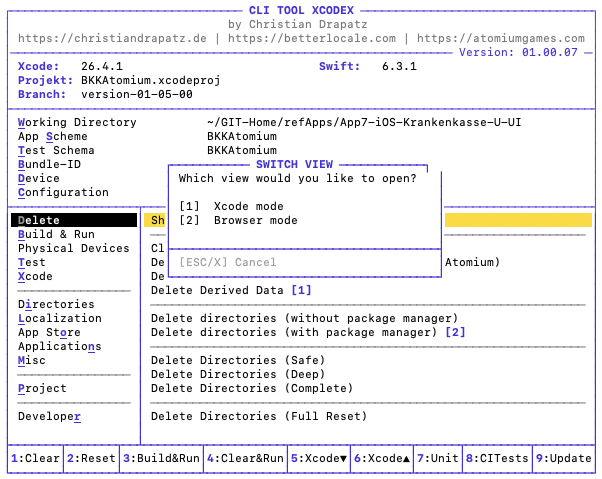
Mit der Leertaste zwischen XCode-Ansicht und Browser-Ansicht wechseln
| Taste | Aktion |
|---|---|
| Leertaste | Zwischen XCode-Ansicht und Browser-Ansicht wechseln |
| Shift+X | Direkt zur XCode-Ansicht springen |
| Shift+W | Direkt zur Browser-Ansicht springen |
| Shift+A | Browser-Ansicht direkt im Arbeitsverzeichnis öffnen |
Die XCode-Ansicht ist der Ausgangspunkt: Hier baust du, testest, archivierst und verwaltest Simulatoren. Die Browser-Ansicht ergänzt sie als schneller Datei-Navigator — ideal zum Prüfen von Verzeichnissen, Öffnen von Dateien oder Setzen eines neuen Arbeitsverzeichnisses, ohne das Terminal zu verlassen.
Wechsel zwischen den Ansichten passiert nahtlos: Die Terminalgröße bleibt identisch, kein Springen, kein Scrollen. Mit Leertaste togglest du hin und her. Mit Shift+X und Shift+W springst du direkt in die gewünschte Ansicht — egal wo du gerade bist. Shift+A öffnet die Browser-Ansicht sofort im aktuellen Arbeitsverzeichnis des Projekts.
7. Clean & Cache
Xcode speichert alle Build-Artefakte in einem gemeinsamen DerivedData-Ordner. Wenn Builds ohne erkennbaren Grund fehlschlagen, die App sich seltsam verhält oder nach einem Refactoring Fehler erscheinen, die im Code nicht existieren — dann hilft ein gezieltes Bereinigen.
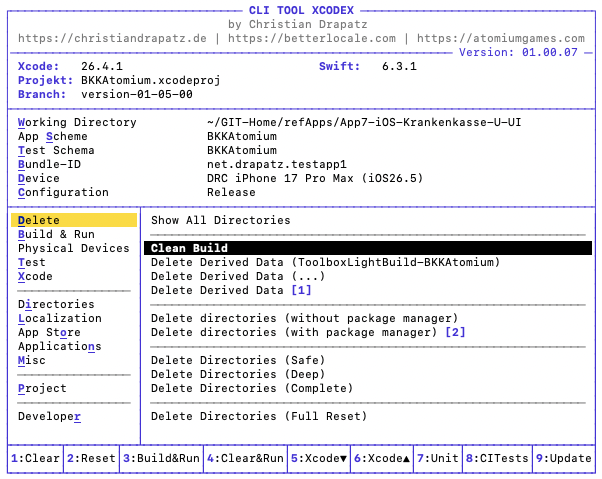
Clean & Cache: verschiedene Bereinigungs-Optionen auf einen Blick
| Aktion | Was wird bereinigt | Wann sinnvoll |
|---|---|---|
| Alle Verzeichnisse anzeigen | Cache-Browser mit Größenanzeige und gezieltem Löschen | Überblick vor dem Löschen |
| Build bereinigen | Kompilierte Artefakte des aktuellen Schemas | Kleiner Reset vor einem sauberen Build |
| Derived Data (Projektname) löschen | Projektspezifischer DerivedData-Ordner | Bei unerklärlichen Build-Fehlern |
| Derived Data löschen | Gesamter DerivedData-Ordner | Vollständiger Build-Cache-Reset |
| Verzeichnisse löschen (ohne Paketmanager) | DerivedData, Xcode-Caches, Simulator-Cache | Schneller Reset ohne Paketmanager anzufassen |
| Verzeichnisse löschen (mit Paketmanager) | + CocoaPods-, Carthage- und SPM-Cache | Wenn auch Paketmanager-Caches bereinigt werden sollen |
| Verzeichnisse löschen (Sicher) | DerivedData, ModuleCache, SwiftPM, Xcode-Caches, Simulator-Cache, Logs, Diagnostic Reports | Umfassender Reset — alles was Xcode automatisch neu anlegt |
| Verzeichnisse löschen (Tief) | Alles aus „Sicher" + Archives, iOS DeviceSupport, alle Simulator-Geräte | Hartnäckige Probleme; viel Speicher zurückgewinnen |
| Verzeichnisse löschen (Komplett) | Alles aus „Tief" + CocoaPods-, Carthage- und SPM-Cache; optional Simulator-Runtimes | Maximale Speicherfreigabe |
| Verzeichnisse löschen (Neustart) | Kompletter Reset inkl. SourcePackages für einen sauberen Projekt-Neustart | Wenn alles neu aufgebaut werden soll |
8. Build & Run
xcodex bietet mehrere vorkonfigurierte Build-Modi, die für häufige Entwicklungsszenarien optimiert sind.
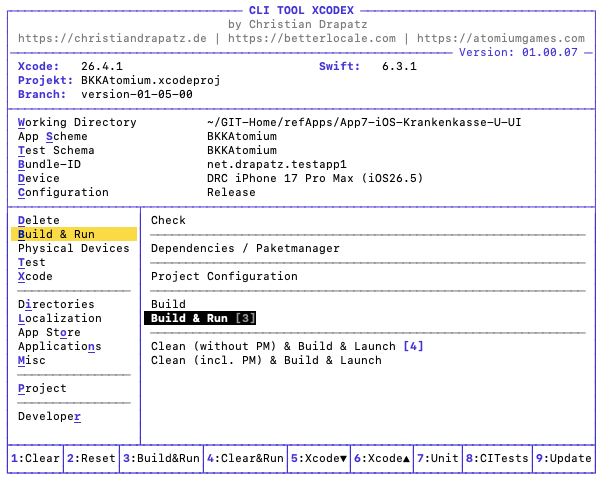
Build & Run: verschiedene Modi für unterschiedliche Situationen
| Aktion | Was passiert | Wann sinnvoll |
|---|---|---|
| Überprüfen | Prüft das Projekt auf Konfigurationsfehler | Vor dem ersten Build in einem neuen Setup |
| Dependencies / Paketmanager | Löst SPM-, CocoaPods- und Carthage-Abhängigkeiten auf | Nach dem Klonen oder bei Paketfehlern |
| Projektkonfiguration | Zeigt alle Build-Einstellungen des gewählten Schemas | Zur Diagnose von Konfigurationsproblemen |
| Bauen | Kompiliert das Projekt ohne zu starten | Schnelle Kompilierungsprüfung |
| Bauen & starten | Baut und startet die App im Simulator oder auf macOS | Normaler Entwicklungsworkflow |
| Bereinigen (ohne Paketmanager) & Bauen & Starten | Löscht DerivedData und Xcode-Caches, baut dann neu und startet | Bei Build-Fehlern durch Cache-Probleme |
| Bereinigen (inkl. Paketmanager) & Bauen & Starten | Löscht alle Caches inkl. Paketmanager-Caches, baut dann neu und startet | Bei hartnäckigen Problemen oder nach Paketmanager-Änderungen |
Build-Ausgabe verstehen
Während des Builds zeigt xcodex jeden Schritt mit seiner Laufzeit an. Bei einem Fehler wird die Fehlermeldung rot hervorgehoben und mit der betroffenen Datei und Zeile angezeigt.
Mit der Taste + lassen sich weitere Zielgeräte hinzufügen, sodass die App parallel auf mehreren Betriebssystemen läuft. So können etwa Unterschiede zwischen iPhone und iPad oder verschiedenen iOS-Versionen direkt im Vergleich erkannt werden.
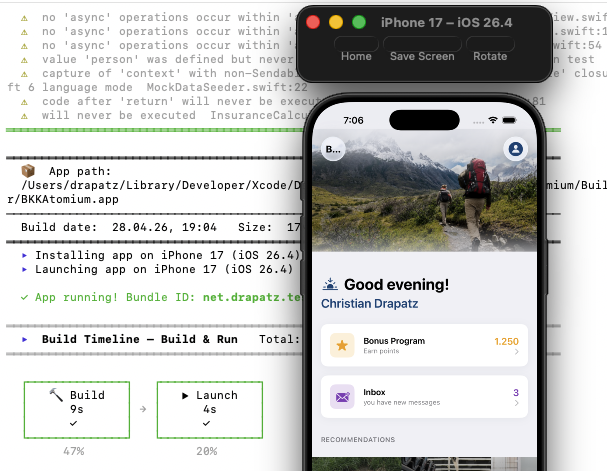
Build-Ausgabe: strukturiert, komprimiert, mit Zeitangaben pro Schritt
Isoliertes DerivedData
xcodex baut in ein eigenes DerivedData-Verzeichnis, das vollständig von Xcode getrennt ist. Beide können gleichzeitig laufen, ohne sich gegenseitig zu beeinflussen.
9. Abhängigkeiten
Wer CocoaPods, SPM oder Carthage nutzt, kann Abhängigkeiten direkt aus xcodex heraus verwalten — ohne Terminal-Kenntnisse.
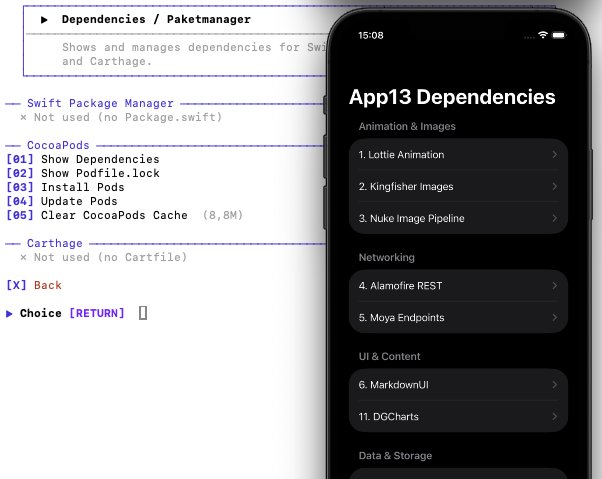
Dependencies: SPM, CocoaPods und Carthage in einem Menü
| Package Manager | Befehl |
|---|---|
| Swift Package Manager | swift package resolve |
| CocoaPods | pod install |
| Carthage | carthage update |
git pull zuerst „Alle Dependencies auflösen" ausführen, bevor gebaut wird — das verhindert die häufigsten „missing module"-Fehler nach Branch-Wechseln.
10. Simulator & Physische Geräte
Je nach ausgewähltem Zielgerät zeigt xcodex entweder die Simulator-Gruppe oder die Physische-Geräte-Gruppe an — nie beide gleichzeitig. Die verfügbaren Aktionen passen sich automatisch an das aktive Gerät an.
Simulator
Simulatoren können in einen inkonsistenten Zustand geraten — besonders nach iOS-Updates oder langen Laufzeiten. Diese Gruppe gibt die Kontrolle zurück.
Simulator: App neu installieren, zurücksetzen, alle Instanzen schließen
| Aktion | Was passiert | Wann sinnvoll |
|---|---|---|
| Neuen Simulator erstellen | Runtime und Gerätetyp wählen, Simulator via xcrun simctl create anlegen | Wenn ein bestimmtes Gerät/iOS-Kombination fehlt |
| App starten | Startet die gebaute App auf dem gewählten Simulator | Nach einem Build ohne erneutes Bauen |
| App auf ausgewähltem Simulator starten | Wie „App starten", aber mit vorheriger Simulator-Auswahl | Zum Testen auf einem anderen Gerät |
| App deinstallieren & frisch testen | Deinstalliert die App und installiert sie neu | Sauberer Start ohne alten App-Zustand |
| Simulator neu starten | Fährt den Simulator herunter und startet ihn neu | Bei hängendem oder instabilem Simulator |
| Simulator stoppen | Fährt den laufenden Simulator herunter | Ressourcen freigeben |
| Simulator zurücksetzen | Setzt den aktuellen Simulator auf Werkszustand zurück | App-Daten und Einstellungen vollständig entfernen |
| Simulator Status anzeigen | Alle Simulatoren nach Runtime gruppiert, farbkodiert (Booted / Shutdown) | Überblick über installierte Simulatoren |
| Simulator Inhalte zurücksetzen | Löscht alle Inhalte aller Simulatoren (xcrun simctl erase all) | Vollständiger Reset aller Simulator-Daten |
| Nicht verfügbare Simulatoren löschen | Entfernt Simulatoren ohne installierte Runtime | Aufräumen nach Xcode-Updates |
| Alle Simulatoren stoppen | Stoppt alle laufenden Simulatoren auf einmal | Ressourcen freigeben, vor einem Build |
| Alle Simulator-Geräte löschen | Entfernt alle Simulator-Geräteeinträge (xcrun simctl delete all) | Vollständiger Neustart der Simulator-Infrastruktur |
| Simulator-Caches löschen | Entfernt temporäre CoreSimulator-Caches | Darstellungsfehler oder Verhalten nach iOS-Updates |
Simulator fernsteuern
Nach dem App-Start lassen sich Simulator-Einstellungen direkt aus xcodex heraus ändern — ohne den Simulator-Menübaum zu durchsuchen.
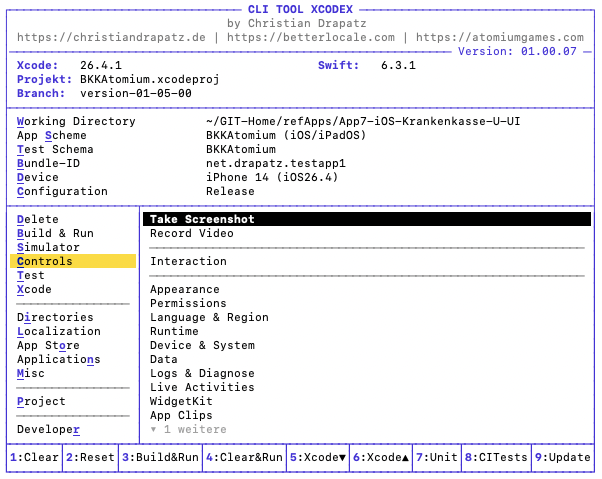
Controls: Dark Mode, Berechtigungen, Statusleiste, Push Notifications
1. Interaktion
| # | Befehl | Nutzen beim Testen |
|---|---|---|
| 01 | Push-Notification testen | Simuliert einen APNs-Payload, ohne echten Server — ideal für Notification-UX-Tests. |
| 02 | Deep Link öffnen | Öffnet einen URL-Scheme direkt, ohne die App manuell zu navigieren. |
2. Erscheinungsbild
| # | Befehl | Nutzen beim Testen |
|---|---|---|
| 01 | Dark / Light Mode umschalten | Prüft, ob alle Assets und Colors korrekt auf beide Modi reagieren. |
| 02 | Status Bar mocken | Setzt definierte Werte (Uhrzeit, Signalstärke) für Screenshots und UI-Tests. |
| 03 | Status Bar zurücksetzen | Setzt den Status Bar-Mock zurück auf den echten Systemzustand. |
| 04 | Dynamic Type setzen | Testet Layout-Stabilität bei extremen Schriftgrößen. |
| 05 | Bold Text umschalten | Prüft Lesbarkeit bei aktivierter Fett-Schrift-Barrierefreiheit. |
| 06 | Reduce Motion umschalten | Stellt sicher, dass Animationen korrekt deaktiviert werden. |
| 07 | Increase Contrast umschalten | Validiert Kontrastverhältnisse für Barrierefreiheit. |
| 08 | Display Zoom setzen (iPhone only) | Testet Layout bei vergrößertem Display-Modus. |
| 09 | Reduce Transparency umschalten | Prüft UI-Elemente mit deaktiviertem Blur-Effekt. |
| 10 | On/Off-Labels umschalten | Sichert, dass Toggles auch ohne Farbe erkennbar sind. |
| 11 | Differentiate Without Color | Testet, ob die App nicht ausschließlich auf Farbe als Informationsträger setzt. |
3. Berechtigungen
| # | Befehl | Nutzen beim Testen |
|---|---|---|
| 01 | Berechtigungen setzen | Granulare Steuerung einzelner Privacy-Grants. |
| 02 | Alle App-Berechtigungen zurücksetzen | Setzt den App-Berechtigungsstatus auf „nicht gefragt" — für Permission-Flow-Tests. |
| 03–19 | Quick Grants (Kamera, Mikrofon, Standort, Fotos, Kontakte, Kalender, Erinnerungen, Bewegung, Health, Netzwerk, Bluetooth, HomeKit, Mediathek, Siri, Sprache, Lokales Netz, User-Tracking) | Einzelne Berechtigung in einem Schritt erteilen — spart Dialog-Klicks bei jedem Testlauf. |
| 20 | Alle Berechtigungen erteilen | Gesamte Berechtigungsliste auf „erlaubt" — für Schnelltests jenseits des Permission-Flows. |
4. Sprache & Region
| # | Befehl | Nutzen beim Testen |
|---|---|---|
| 01 | App-Sprache setzen | Prüft Lokalisierung der App ohne Systemsprache zu ändern. |
| 02 | Systemsprache setzen | Testet globale Spracheffekte (Tastatur, Systemdialoge). |
| 03 | 24h-Format umschalten | Validiert Zeitdarstellung in beiden Formaten. |
| 04 | Systemsprache zurücksetzen | Setzt alle Spracheinstellungen auf Werksstandard zurück. |
5. Laufzeit
| # | Befehl | Nutzen beim Testen |
|---|---|---|
| 01 | Slow Animations | Verlangsamt Animationen — Fehler im Übergang werden sichtbar. |
| 02 | Clipped Views hervorheben | Zeigt abgeschnittene UI-Elemente sofort rot markiert. |
| 03 | Launch Arguments setzen | Injiziert -Argument-Flags für Feature-Flags und Test-Modi ohne Build. |
| 04 | Env-Variablen setzen | Übergibt Umgebungsvariablen an die App beim Start. |
| 05 | Memory Pressure simulieren | Testet das Verhalten der App bei Speicherdruck (Warnstufen). |
| 06 | URL-Scheme testen | Öffnet einen Deep Link und prüft die Verarbeitung. |
| 07 | Core Data Debug | Aktiviert SQL-Logging für Core Data — zeigt alle Queries. |
| 08 | Localization Debug | Aktiviert doppelte Länge / Pseudosprache — Layout-Probleme werden sofort sichtbar. |
| 09 | SwiftUI Debug | Zeigt SwiftUI-Render-Grenzen und Invalidierungen in der Konsole. |
| 10 | Background Fetch | Löst einen Hintergrund-Fetch manuell aus — ohne 20-Minuten-Wartezeit. |
| 11 | Background Launch | Startet die App im Hintergrundmodus. |
| 12 | Metal Validation | Aktiviert Metal-API-Validierung für GPU-Code. |
6. Gerät & System
| # | Befehl | Nutzen beim Testen |
|---|---|---|
| 01 | Standort setzen | Simuliert GPS-Koordinaten ohne echten Standort. |
| 02 | Batteriestatus simulieren | Testet Low-Battery-Warnungen und Ladestand-Logik. |
| 03 | Cellular-Modus setzen | Simuliert EDGE, LTE, 5G oder kein Signal. |
| 04 | IDFA zurücksetzen | Setzt die Advertising-ID zurück — für Tracking-Tests. |
| 05 | iCloud-Sync auslösen | Erzwingt einen iCloud-Sync ohne Wartezeit. |
| 06 | Zeitzone setzen | Testet zeitzonensensitive Logik (Kalender, Countdowns). |
| 07 | Status Bar Uhrzeit mocken | Setzt eine feste Uhrzeit für konsistente Screenshots. |
| 08 | Standortsimulation stoppen | Beendet den simulierten GPS-Standort. |
| 09 | WLAN-Balken setzen | Testet UI bei verschiedenen WLAN-Signalstärken. |
| 10 | Cellular-Balken setzen | Testet UI bei verschiedenen Mobilfunk-Signalstärken. |
| 11 | Netzanbieter-Name setzen | Setzt einen eigenen Carrier-Namen in der Status Bar. |
| 12 | Stage Manager (iPad only) | Testet das Layout im Stage-Manager-Modus. |
| 13 | Audio-Route setzen | Wechselt zwischen Lautsprecher, Kopfhörer, Bluetooth. |
7. Daten
| # | Befehl | Nutzen beim Testen |
|---|---|---|
| 01 | Medien hinzufügen | Importiert Bilder/Videos in die Foto-Bibliothek des Simulators. |
| 02 | Simulator-Keychain leeren | Entfernt alle gespeicherten Keychain-Einträge der App. |
| 03 | App-Datenordner öffnen | Öffnet den Container direkt im Finder — für manuelles Datei-Debugging. |
| 04 | App UserDefaults zurücksetzen | Löscht alle gespeicherten UserDefaults-Werte der App. |
| 05 | Alle App-Daten löschen | Entfernt den kompletten App-Container. |
| 06 | App-Group-Container öffnen | Öffnet den geteilten Container im Finder. |
| 07 | App-Defaults anzeigen | Listet alle aktuellen UserDefaults-Keys und -Werte. |
| 08 | SQLite-Datenbank öffnen | Öffnet die App-Datenbank direkt in einem externen Editor. |
| 09 | Keychain-Einträge anzeigen | Listet alle gespeicherten Keychain-Einträge der App. |
| 10 | Root-Zertifikat installieren | Installiert ein eigenes CA-Zertifikat für SSL-Pinning-Tests. |
| 11 | App-Container messen | Zeigt die Größe des App-Containers auf Disk. |
| 12 | App-Container exportieren | Exportiert den Container als Archiv für Offline-Analyse. |
| 13 | UserDefaults-Key bearbeiten | Ändert einzelne Keys direkt — ohne App-Neustart. |
8. Logs & Diagnose
| # | Befehl | Nutzen beim Testen |
|---|---|---|
| 01 | App-Logs streamen | Live-Log-Ausgabe der App in der Konsole. |
| 02 | Konsole filtern | Filtert die Systemkonsole auf relevante Subsysteme. |
| 03 | Crash-Log öffnen | Öffnet den letzten Crash-Report der App. |
| 04 | Diagnose-Report erstellen | Erstellt einen vollständigen Simulator-Diagnosebericht. |
| 05 | App-Version anzeigen | Zeigt Bundle-Version und Build-Nummer der installierten App. |
| 06 | System-Logs streamen | Vollständige Systemkonsole des Simulators. |
| 07 | Privacy Manifest validieren | Prüft das PrivacyInfo.xcprivacy auf Vollständigkeit. |
| 08 | SwiftData Debug | Aktiviert SQL-Logging für SwiftData. |
| 09 | Sysdiagnose erstellen | Erstellt ein vollständiges System-Diagnose-Archiv. |
9. Live Activities
| # | Befehl | Nutzen beim Testen |
|---|---|---|
| 01 | Live Activity starten | Startet eine Live Activity mit eigenem Payload. |
| 02 | Live Activity aktualisieren | Sendet ein Update an eine laufende Live Activity. |
| 03 | Live Activity beenden | Beendet eine Live Activity. |
10. WidgetKit
| # | Befehl | Nutzen beim Testen |
|---|---|---|
| 01 | Widget-Timelines neu laden | Erzwingt ein Timeline-Refresh ohne Wartezeit. |
| 02 | Widget-Cache leeren | Leert den internen WidgetKit-Cache. |
11. App Clips
| # | Befehl | Nutzen beim Testen |
|---|---|---|
| 01 | App Clip URL testen | Öffnet eine App-Clip-Experience via URL. |
| 02 | App-Clip-Experience zurücksetzen | Setzt den gespeicherten App-Clip-Zustand zurück. |
Physische Geräte
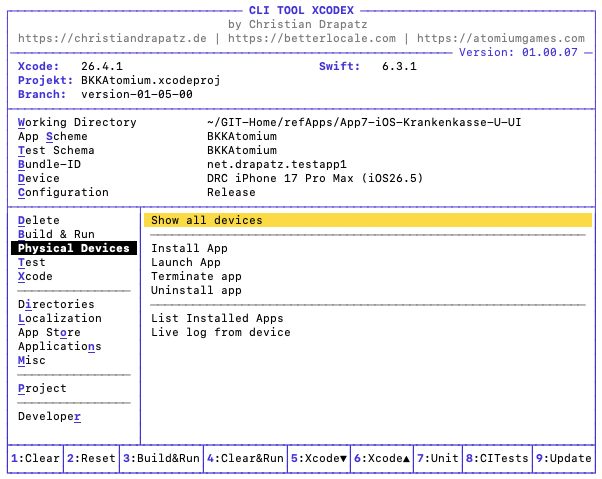
Die Gruppe steuert direkt angeschlossene iOS-Geräte über USB oder WLAN. Sie ist nur sichtbar, wenn ein physisches Gerät als Ziel ausgewählt ist.
Vollständige Geräteverwaltung für physische iOS-Geräte direkt im Terminal
| Aktion | Beschreibung |
|---|---|
| Alle Geräte anzeigen | Listet alle verbundenen physischen Geräte mit Name, UDID und iOS-Version auf |
| App installieren | Installiert den zuletzt gebauten App-Bundle auf dem verbundenen Gerät (Gerät muss entsperrt und vertrauenswürdig sein) |
| App starten | Startet die installierte App auf dem verbundenen Gerät |
| App beenden | Beendet den App-Prozess auf dem Gerät, ohne das Gerät manuell zu bedienen |
| App deinstallieren | Entfernt die App vollständig vom Gerät einschließlich aller lokalen Daten |
| Installierte Apps auflisten | Zeigt Bundle-Identifier und Namen aller installierten Apps auf dem Gerät |
| Live-Log vom Gerät | Streamt Konsolenausgaben des Geräts in Echtzeit — beenden mit Ctrl+C |
11. Tests
xcodex trennt Unit-Tests und UI-Tests, damit der jeweils passende Durchlauf gestartet werden kann — schnelle Unit-Tests im Entwicklungsloop, UI-Tests vor Commits oder Releases.
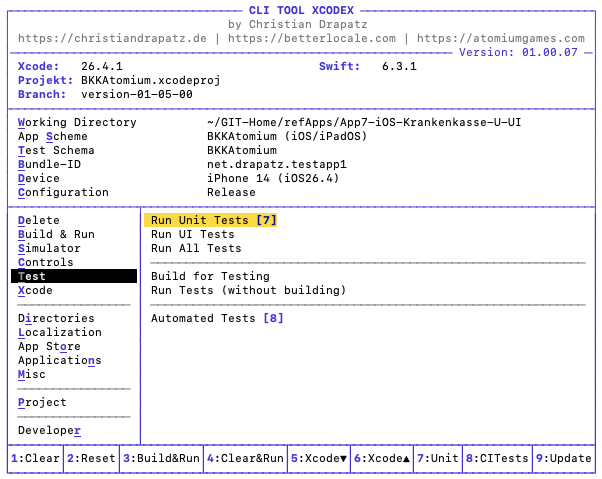
Tests: Unit-Tests, UI-Tests und alle Tests auf einen Klick
| Testart | Beschreibung |
|---|---|
| Unit-Tests | Schnell, kein Simulator-Start nötig |
| UI-Tests | Startet die App im Simulator, führt Interaktionstests durch |
| Alle Tests | Kombinierter Durchlauf |
Testergebnisse & Auswertung
Die Testergebnisse werden klar und direkt dargestellt:
- ✅ Bestanden – Test erfolgreich ausgeführt
- ⚠️ Übersprungen – Test wurde nicht ausgeführt
- ❌ Fehlgeschlagen – Test ist fehlgeschlagen
Tests erweitern
Mit der Taste + kannst du Tests auf weitere Geräte ausweiten. So lässt sich das Verhalten deiner App parallel auf unterschiedlichen Simulatoren oder Geräten prüfen.
Code Coverage
Mit der Taste C öffnest du die Code-Coverage. Diese wird übersichtlich als Baumstruktur dargestellt und zeigt dir direkt, welche Dateien und Klassen durch Tests abgedeckt sind – und wo noch Lücken bestehen.
Fehlgeschlagene Tests einzeln wiederholen
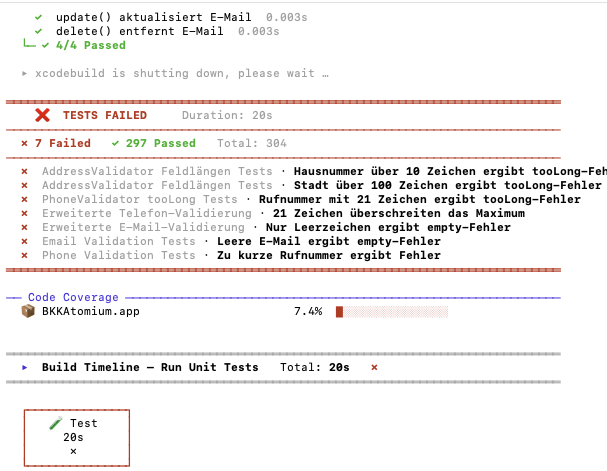
Fehlgeschlagene Tests werden rot markiert und können einzeln neu gestartet werden
Nach einem Durchlauf listet xcodex alle Ergebnisse auf. Fehlgeschlagene Tests können einzeln neu gestartet werden — ohne die gesamte Test-Suite zu wiederholen. Typischer Workflow:
- Alle Tests starten
- Fehlgeschlagene Tests identifizieren
- Fix implementieren
- Nur die betroffenen Tests erneut ausführen
- Bei Erfolg: vollständigen Durchlauf zur Bestätigung starten
Code Coverage
Mit der Code-Coverage-Ansicht siehst du direkt, wie gut dein Projekt durch Tests abgedeckt ist. xcodex kann Testläufe mit aktivierter Coverage starten, Ergebnisse auswerten und dir zeigen, welche Bereiche bereits gut getestet sind und wo noch Lücken bestehen. Das hilft dir, Schwachstellen früh zu erkennen, bevor sie im Review, in der CI/CD-Pipeline oder später im Release auffallen.
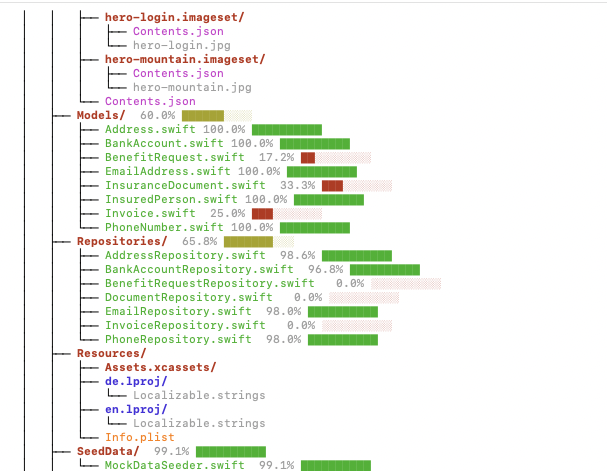
Code Coverage auf Dateiebene: schnell identifizieren, wo Tests fehlen
| Abdeckung | Bewertung |
|---|---|
| 80–100 % | Gut abgedeckt — kritische Pfade sind getestet |
| 50–80 % | Verbesserungspotenzial, besonders bei komplexer Logik |
| < 50 % | Hohes Risiko bei Änderungen — Tests fehlen |
Automatisierte Tests
Die Ansicht für automatisierte Tests bündelt wiederkehrende Testläufe in einem klaren Terminal-Workflow. Du kannst Unit-Tests gezielt ausführen und verschiedene Kombinationen aus Schema, Device und Konfiguration testen. Damit lassen sich typische Prüfungen vor einem Pull Request oder Release schneller wiederholen, ohne jedes Mal lange xcodebuild-Befehle zusammenzubauen.
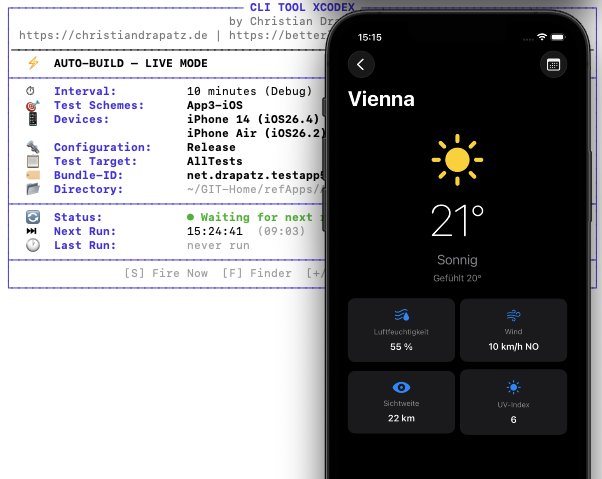
Automatisierte Tests laufen vollständig unabhängig von Xcode
Die automatisierten Tests laufen vollständig unabhängig von Xcode — Xcode kann gleichzeitig geöffnet sein, ohne Auswirkungen auf den Test-Durchlauf. Ideal für:
- Parallel zur Entwicklung — Tests für Feature A, während man an Feature B arbeitet
- QA ohne Xcode-Kenntnisse — Tester können eigenständig Test-Durchläufe starten
- Zweiter Clone — letzten Commit testen, ohne die eigene Entwicklungsumgebung zu berühren
12. Xcode-Integration
Diese Gruppe enthält Schnellzugriff-Befehle für Xcode selbst — für den Wechsel zwischen Terminal und IDE.
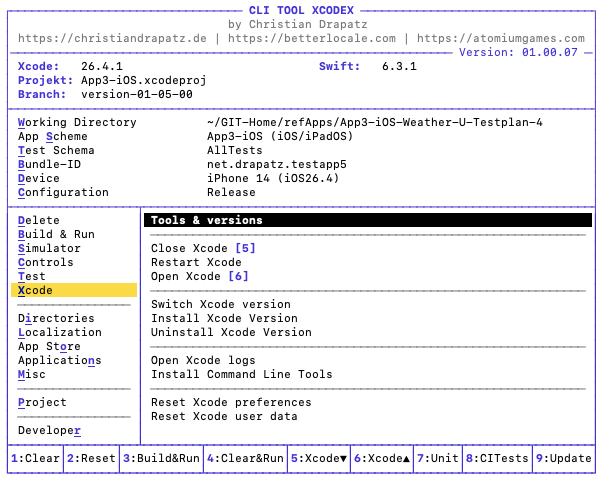
Xcode öffnen und schließen direkt aus xcodex
| Aktion | Was passiert | Wann sinnvoll |
|---|---|---|
| Tools & Versionen | Zeigt installierte Versionen von Xcode, Swift, CocoaPods, SwiftLint u.a. | Schneller Überblick über die Entwicklungsumgebung |
| Xcode schließen | Beendet Xcode | Vor Cache-Aktionen oder einem Xcode-Wechsel |
| Xcode neu starten | Schließt Xcode und öffnet es danach neu | Bei hängendem Xcode oder nach Einstellungsänderungen |
| Xcode öffnen | Öffnet das aktuelle Projekt in Xcode | Schneller Einstieg ohne Finder |
| Xcode-Version wechseln | Wechselt die aktive Xcode-Version via xcode-select | Wenn mehrere Xcodes installiert sind und gezielt eine genutzt werden soll |
| Xcode-Version installieren | Installiert eine neue Xcode-Version via Xcodes | Neue Xcode-Version parallel zur bestehenden installieren |
| Xcode-Version deinstallieren | Entfernt eine installierte Xcode-Version via Xcodes | Alte Versionen löschen und Speicher freigeben |
| Xcode-Protokolle öffnen | Öffnet ~/Library/Logs/Xcode im Finder | Bei unerklärlichen Fehlern oder Abstürzen in Xcode |
| Command Line Tools installieren | Startet den macOS-Systemdialog zur CLT-Installation | Nach einem macOS-Update oder auf einem neuen Mac |
| Xcode-Einstellungen zurücksetzen | Löscht com.apple.dt.Xcode.plist nach Bestätigung | Bei UI-Hängern oder fehlerhaften Tastaturkürzeln in Xcode |
| Xcode-Benutzerdaten zurücksetzen | Entfernt ~/Library/Developer/Xcode/UserData/ nach Bestätigung (Keybindings, Themes, Snippets) | Wenn Xcode-Anpassungen Probleme verursachen |
13. App Store & Distribution
xcodex deckt den gesamten Distributionsprozess ab — vom Archivieren bis zum Upload. Das spart die manuelle Arbeit im Xcode Organizer und ermöglicht Uploads direkt aus dem Terminal.

App Store: Archivieren, Validieren und Hochladen in einem strukturierten Workflow
Voraussetzung: App-spezifisches Passwort
Für den Upload zu TestFlight oder App Store Connect benötigt xcodex ein App-spezifisches Passwort:
- Öffne appleid.apple.com
- Gehe zu Sicherheit → App-spezifische Passwörter
- Erstelle ein neues Passwort (z. B. „xcodex Upload")
- Das Passwort wird einmalig in den xcodex-Einstellungen hinterlegt
Typischer Release-Workflow
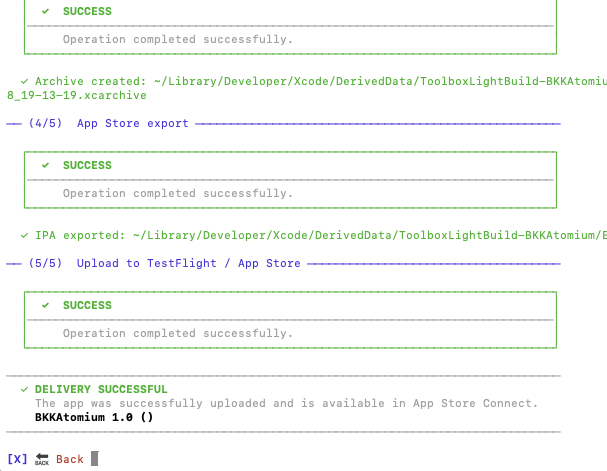
Release-Workflow: Validieren vor dem Upload schützt vor häufigen Einreichungsfehlern
- Full Reset & Build mit Release-Konfiguration
- Archivieren
- Validieren — Fehler korrigieren, falls vorhanden
- Zu TestFlight hochladen — für Beta-Tests
- Nach Freigabe: In den App Store einreichen
14. Verzeichnisse
Xcode verteilt seine Daten über mehrere verschachtelte Library-Pfade. xcodex öffnet die wichtigsten Ordner mit einem Tastendruck direkt im Finder.
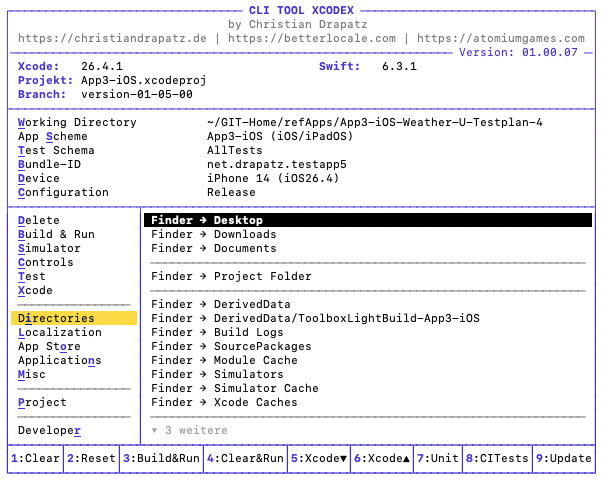
Verzeichnisse: DerivedData, Archive, Simulatoren und Provisioning Profiles auf einen Klick
| Aktion | Pfad | Inhalt |
|---|---|---|
| Finder → Schreibtisch | ~/Desktop | Desktop-Dateien |
| Finder → Downloads | ~/Downloads | Download-Ordner |
| Finder → Dokumente | ~/Documents | Dokumente |
| Finder → Projektordner | aktuelles Arbeitsverzeichnis | .xcworkspace / .xcodeproj und Projektdateien |
| Finder → DerivedData | ~/Library/Developer/Xcode/DerivedData | Gesamtes DerivedData aller Projekte |
| Finder → DerivedData/<Projektname> | ~/Library/Developer/Xcode/DerivedData/<Projektname>-… | DerivedData des aktuellen Projekts |
| Finder → Build Logs | …/DerivedData/<Projektname>/Logs/Build | Build-Protokolle des aktuellen Projekts |
| Finder → SourcePackages | …/DerivedData/<Projektname>/SourcePackages | Geklonte SPM-Pakete des aktuellen Projekts |
| Finder → Module Cache | ~/Library/Developer/Xcode/DerivedData/ModuleCache.noindex | Vorkompilierter Modul-Cache |
| Finder → Xcode Caches | ~/Library/Caches/com.apple.dt.Xcode | Xcode-eigene Cache-Daten |
| Finder → Simulatoren | ~/Library/Developer/CoreSimulator/Devices | Alle Simulator-Geräte und App-Daten |
| Finder → Simulator Cache | ~/Library/Developer/CoreSimulator/Caches | Temporäre Simulator-Caches |
| Finder → Archives | ~/Library/Developer/Xcode/Archives | Xcode-Archive (.xcarchive) |
| Finder → DiagnosticReports | ~/Library/Logs/DiagnosticReports | Crash- und Diagnose-Berichte des Systems |
| Finder → iOS Device Logs | ~/Library/Logs/CrashReporter | Crash-Logs von angeschlossenen Geräten |
| Finder → Provisioning Profiles | ~/Library/MobileDevice/Provisioning Profiles | Installierte Provisioning Profiles |
15. Lokalisierung
Fehler in der Lokalisierung fallen oft erst zur Laufzeit auf – dann, wenn die App bereits ausgeliefert ist. xcodex prüft die .xcstrings-Datei vollständig statisch, ohne Build-Prozess und ohne Xcode. Fehlende Keys, doppelte Einträge und Inkonsistenzen zwischen Sprachen werden sofort sichtbar gemacht. So lassen sich Lokalisierungsprobleme schon während der Entwicklung erkennen und beheben, bevor sie den Nutzer erreichen.
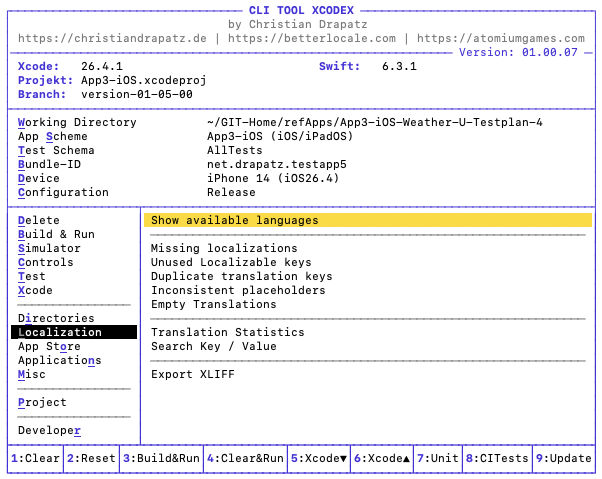
Lokalisierung: fehlende Keys, doppelte Keys und Konsistenz-Prüfung
| Aktion | Was passiert | Wann sinnvoll |
|---|---|---|
| Verfügbare Sprachen anzeigen | Listet alle erkannten Sprachcodes aus .lproj-Ordnern und .xcstrings-Dateien | Überblick welche Sprachen im Projekt vorhanden sind |
| Fehlende Lokalisierungen | Zeigt Keys, die in mindestens einer Sprache komplett fehlen | Vor einem Release prüfen ob alle Sprachen vollständig sind |
| Ungenutzte Localizable-Keys | Zeigt Keys, die in den Lokalisierungsdateien vorhanden, aber im Code nicht referenziert werden | Aufräumen von veralteten oder vergessenen Keys |
| Doppelte Übersetzungsschlüssel | Findet Keys, die mehrfach in derselben Datei vorkommen | Bei unerklärlichen Übersetzungsfehlern |
| Inkonsistente Platzhalter | Erkennt Keys bei denen sich die Platzhalter (%@, %d u.a.) zwischen Sprachen unterscheiden | Verhindert Abstürze durch falsche Format-Argumente |
| Leere Übersetzungen | Findet Keys mit vorhandenem, aber leerem Eintrag ("" oder nur Leerzeichen) | Ergänzt die Prüfung auf fehlende Keys — leere Werte werden sonst übersehen |
| Übersetzungsstatistik | Zeigt den Übersetzungsgrad pro Sprache als Fortschrittsbalken aus .xcstrings-Dateien | Schneller Überblick wie vollständig jede Sprache übersetzt ist |
| Schlüssel / Wert suchen | Interaktive Suche in .xcstrings nach Key-Name oder Übersetzungswert | Einen bestimmten Text oder Key schnell finden |
| XLIFF exportieren | Führt xcodebuild -exportLocalizations aus und legt ein .xcloc-Paket auf dem Desktop ab | Übersetzungspakete für externe Übersetzer erstellen |
.xcstrings-Datei direkt — keine Abhängigkeit von Xcode oder einem Build-Prozess.
16. Programme
Die Befehlsgruppe „Programme" ermöglicht es, häufig verwendete macOS-Apps direkt aus der Toolbox heraus zu öffnen — ohne Dock, Spotlight oder Finder. Nur tatsächlich installierte Apps erscheinen in der Liste. Apps werden über ihren vollständigen Pfad gestartet, was auf macOS 26+ zuverlässiger ist als der open -a-Befehl.
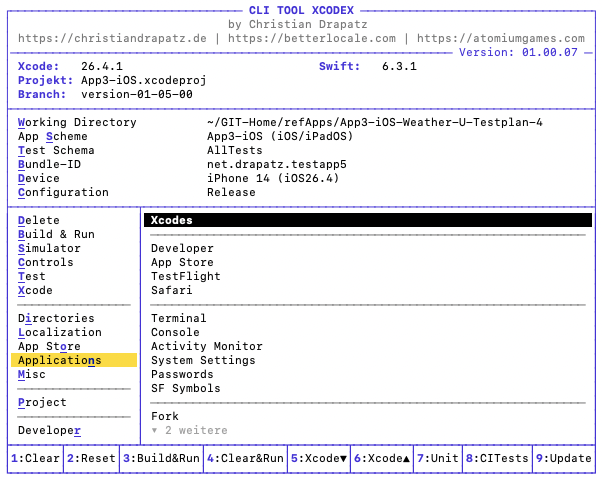
Häufig verwendete macOS-Apps direkt aus der Toolbox öffnen
| App | Gruppe | Zweck |
|---|---|---|
| Xcodes | Apple Entwicklertools | Xcode-Versionen verwalten, installieren und wechseln |
| Developer | Apple Entwicklertools | Apple Developer Portal und Dokumentation |
| App Store | Apple Entwicklertools | App Store öffnen |
| TestFlight | Apple Entwicklertools | Beta-Apps verwalten und testen |
| Safari | Apple Entwicklertools | Webbrowser für Dokumentation und Recherche |
| Terminal | Systemwerkzeuge | Kommandozeile |
| Konsole | Systemwerkzeuge | Systemlogs und Diagnosemeldungen lesen |
| Aktivitätsanzeige | Systemwerkzeuge | CPU-, Speicher- und Prozessauslastung überwachen |
| Systemeinstellungen | Systemwerkzeuge | macOS-Einstellungen |
| Passwörter | Systemwerkzeuge | macOS-Passwörter und Keychain verwalten |
| SF-Symbole | Systemwerkzeuge | Apple SF Symbols durchsuchen und kopieren |
| Fork | Drittanbieter | Git-Client |
| Insomnia | Drittanbieter | REST- und API-Tests |
| Cyberduck | Drittanbieter | FTP/SFTP/S3-Dateiübertragung |
| DevCleaner | Drittanbieter | Xcode-Caches und Entwicklerdaten bereinigen |
17. Verschiedenes
Unter Verschiedenes sind Funktionen gebündelt, die seltener im täglichen Workflow vorkommen, aber im richtigen Moment entscheidend sein können. Dazu gehören die Analyse von Crash Reports, das Starten von Instruments-Sessions und die Verwaltung von Provisioning Profiles. Gerade bei schwer reproduzierbaren Abstürzen oder Build-Problemen kurz vor einem Release sind diese Werkzeuge unverzichtbar – und direkt aus xcodex heraus erreichbar.
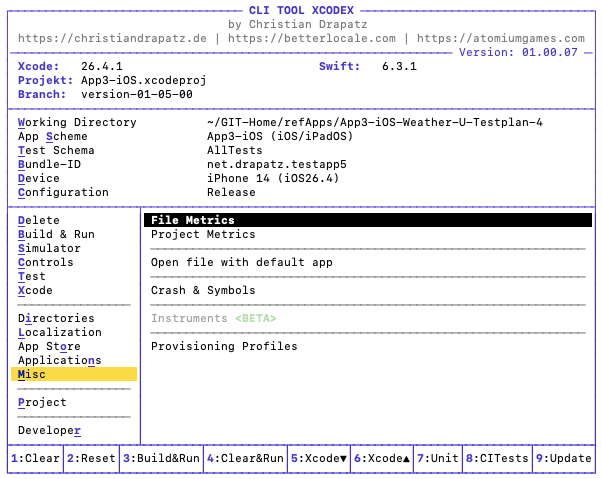
Crash Reports, Instruments und Provisioning Profiles
- Crash Reports analysieren — symbolisiert
.crash-Dateien und zeigt lesbare Stack Traces. Erfordert das passende.dSYM-Archiv - Instruments (Beta) — startet Profiling-Sessions direkt aus xcodex heraus
- Provisioning Profiles verwalten — listet alle lokalen Profile auf und erlaubt die Bereinigung abgelaufener Profile
Provisioning Profiles im Überblick
Diese Ansicht zeigt dir alle lokal verfügbaren Provisioning Profiles auf einen Blick. Du erkennst sofort, welche gültig sind, zu welcher App sie gehören und wo es Probleme gibt. So findest du schnell die Ursache, wenn Builds lokal nicht laufen – ohne dich durch Xcode klicken zu müssen.
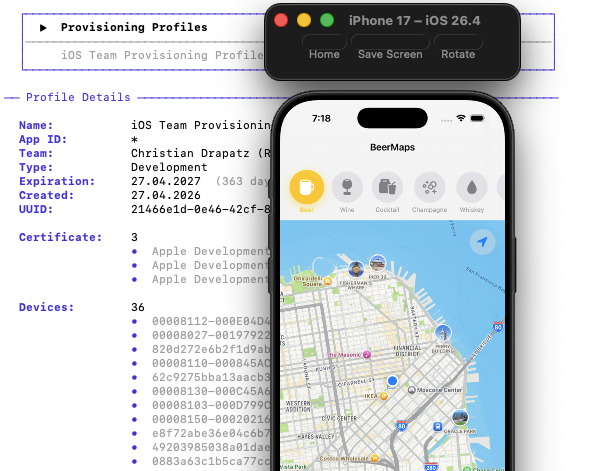
Alle lokalen Provisioning Profiles auf einen Blick — abgelaufene direkt entfernen
| Spalte | Information |
|---|---|
| Name | Lesbarer Profilname |
| App ID | Bundle Identifier, für den das Profil gilt |
| Typ | Development, AdHoc, App Store, Enterprise |
| Ablaufdatum | Wann das Profil ungültig wird |
| Geräte | Anzahl der zugeordneten Geräte (bei Development/AdHoc) |
18. Entwicklungsumgebungen isolieren
Diese Funktion klont ein Repository in ein separates Verzeichnis auf der Festplatte. Die eigene Entwicklungsumgebung bleibt dabei vollständig unberührt. Man kann so z. B. einen Feature-Branch parallel auschecken und mit xcodex testen — während Xcode weiterhin am eigenen Branch arbeitet.
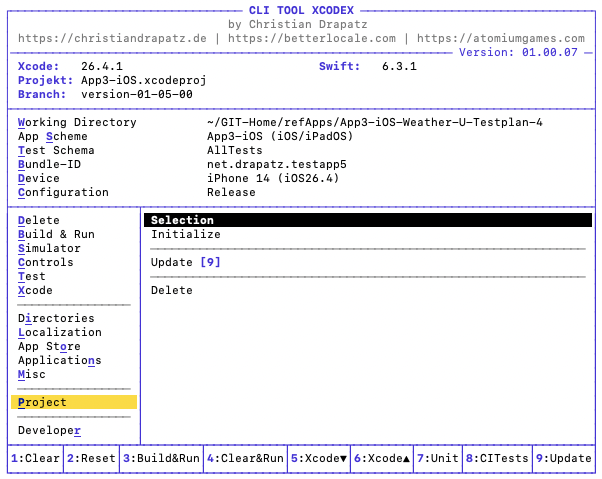
Isolierte Entwicklungsumgebungen: QA und Tester können eigenständig bauen und testen
Workflow
| Schritt | Beschreibung |
|---|---|
| 1. Auswahl | Beim ersten Start muss eine JSON-Konfigurationsdatei ausgewählt werden (siehe unten). Wurde bereits eine Datei geladen, zeigt xcodex diese an — man bestätigt einfach, ob man sie weiter verwenden möchte, oder wählt eine neue. |
| 2. Verzeichnis bereinigen | Falls das Zielverzeichnis bereits existiert, fragt xcodex, ob es vorher gelöscht werden soll. Das ist sinnvoll, um mit einem sauberen Stand zu beginnen. |
| 3. Repository klonen | Das Repository wird geklont und im konfigurierten Zielverzeichnis abgelegt. Dieser Schritt kann jederzeit erneut über den Befehl Initialisieren im Hauptmenü angestoßen werden. |
| 4. Arbeitsverzeichnis festlegen | Nach dem Klonen fragt xcodex, ob das geklonte Verzeichnis als Arbeitsverzeichnis verwendet werden soll. Das entspricht dem Workflow beim Drücken von A im Hauptmenü: xcodex sucht das Xcode-Projekt im geklonten Verzeichnis und verbindet es als aktives Projekt. |
| 5. Aktualisieren | Mit Aktualisieren kann ein beliebiger Branch ausgewählt werden. Alle lokalen Änderungen im temporären Verzeichnis werden dabei verworfen — der Branch wird auf den neuesten Commit zurückgesetzt. So lassen sich ältere Versionen oder andere Branches gezielt vergleichen und testen. |
| 6. Löschen | Mit Löschen wird das gesamte geklonte Verzeichnis entfernt. Die eigene Entwicklungsumgebung bleibt unberührt. |
Typische Anwendungsfälle
- QA und Tester — eigenständig den aktuellen develop-Branch bauen und testen, ohne Xcode-Kenntnisse
- Android-Entwickler — iOS-App in einem definierten Stand ausprobieren
- UX-Designer — Feature-Branch schnell auf dem Simulator starten
- Code-Reviews — zweiter Clone zum Testen des Review-Branches, ohne die eigene Umgebung zu berühren
Konfigurationsdatei
Da xcodex nicht wissen kann, welches Repository geklont werden soll und wohin, muss man vorab eine JSON-Konfigurationsdatei erstellen und an einem beliebigen Ort auf der Festplatte ablegen. Diese Datei wird einmalig über Auswahl geladen und anschließend gespeichert — beim nächsten Start ist sie automatisch vorausgewählt.
| Feld | Bedeutung |
|---|---|
description | Frei wählbarer Name für diese Konfiguration — wird in xcodex als Bezeichnung angezeigt |
base | Basisverzeichnis, in das alle Repositories geklont werden (muss mit / enden) |
repositories[].name | Anzeigename des Repositories |
repositories[].url | Git-URL des Repositories (SSH oder HTTPS) |
repositories[].destination | Unterordner innerhalb von base, in den geklont wird |
Das vollständige Verzeichnis des geklonten Repositories ergibt sich aus: base + destination. Im Beispiel unten also: /Users/drapatz/Downloads/tempApps/refApps/
{
  "description": "RefenzApps",
  "base": "/Users/drapatz/Downloads/tempApps/",
  "repositories": [
    {
      "name": "RefenzApps-Repository",
      "url": "git@github.com:beispiel/repo.git",
      "destination": "refApps"
    }
  ]
}
xcodex-env.json) und an jedem Ort auf der Festplatte liegen. Empfehlenswert ist ein fester Ablageort wie das Home-Verzeichnis oder ein Projektordner, damit sie leicht wiedergefunden wird.
19. Developer-Ressourcen
In der letzten Befehlsgruppe sind die am häufigsten benötigten Dokumentations- und Verwaltungsseiten für Apple-Entwickler gebündelt – von der Apple Developer Documentation über App Store Connect bis zum Swift Package Index.
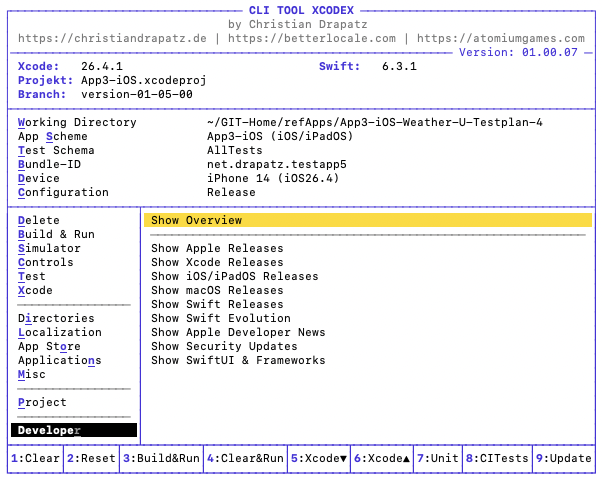
Direktzugriff auf Apple-Dokumentation, App Store Connect und Swift Package Index
| Ressource | Inhalt |
|---|---|
| Apple Developer Documentation | Offizielle Dokumentation aller Apple-Frameworks und APIs |
| Swift Documentation & Evolution Proposals | Sprachspezifikation und aktive Sprachvorschläge |
| Human Interface Guidelines | Design-Richtlinien für iOS, iPadOS und macOS |
| App Store Connect | App-Verwaltung, TestFlight und Verkaufsberichte |
| Apple Developer Portal | Zertifikate, Provisioning Profiles und Geräte |
| Swift Package Index | Verzeichnis aller Swift-Pakete |
20. Browser-Ansicht
Die Browser-Ansicht ist ein vollständig per Tastatur bedienbarer Datei-Browser direkt in xcodex. Du navigierst durch Verzeichnisse, öffnest Dateien, setzt Favoriten und führst Suchen oder Filter aus – alles ohne Maus und ohne Kontextwechsel.
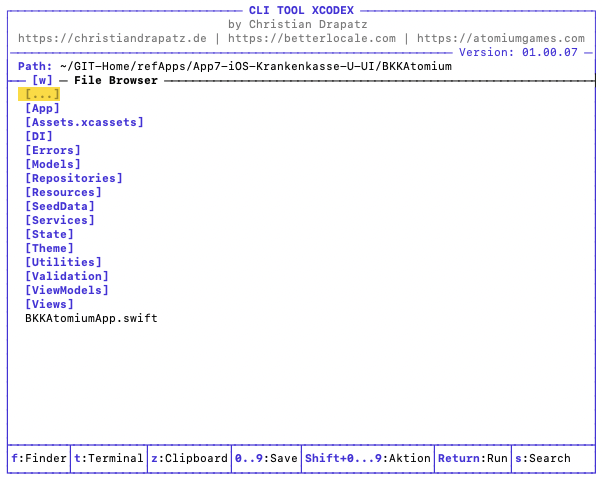
Tastaturgesteuerter Datei-Browser direkt in xcodex
Hotkeys
xcodex ist vollständig auf schnelle Tastatursteuerung ausgelegt. Häufige Aktionen lassen sich direkt über Hotkeys starten, ohne durch lange Menüs zu springen.
| Taste | Aktion |
|---|---|
| Z | Zum Arbeitsverzeichnis des Projekts wechseln |
| 0–9 | Favorit aufrufen |
| Shift+0–9 | Aktuelles Verzeichnis als Favorit speichern |
| F | Suche starten |
| T | Filter aktivieren |
| S | Auswahl bestätigen / Verzeichnis setzen |
| D | Ausgewähltes Verzeichnis als Arbeitsverzeichnis übernehmen |
| W | In Finder öffnen |
Hilfe
In der Browser-Ansicht steht dir eine kontextsensitive Hilfe zur Verfügung. Drücke H, um das Hilfe-Overlay einzublenden. Es zeigt alle verfügbaren Tastenkürzel und Aktionen für die aktuelle Ansicht — übersichtlich und direkt aufrufbar, ohne die Browser-Ansicht zu verlassen.
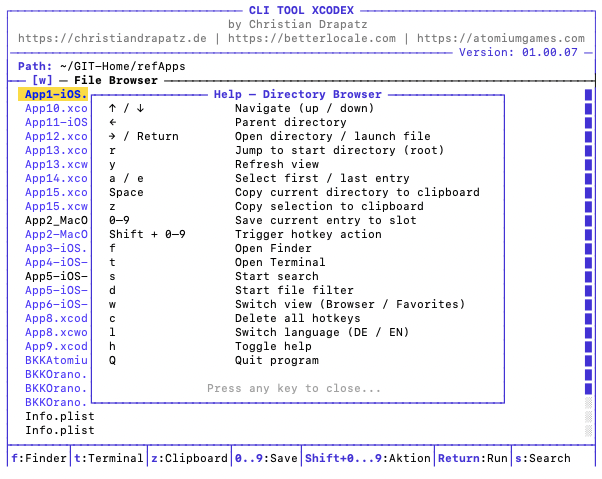
Kontextsensitive Hilfe — alle Tastenkürzel auf einen Blick
Favoriten
Für häufig genutzte Verzeichnisse kannst du dir bis zu 10 Schnellzugriffe anlegen. Mit den Tasten 0–9 speicherst du deine Favoriten, mit Shift + 0–9 springst du direkt dorthin. Alternativ wechselst du mit W schnell zwischen Browser- und Favoriten-Ansicht.
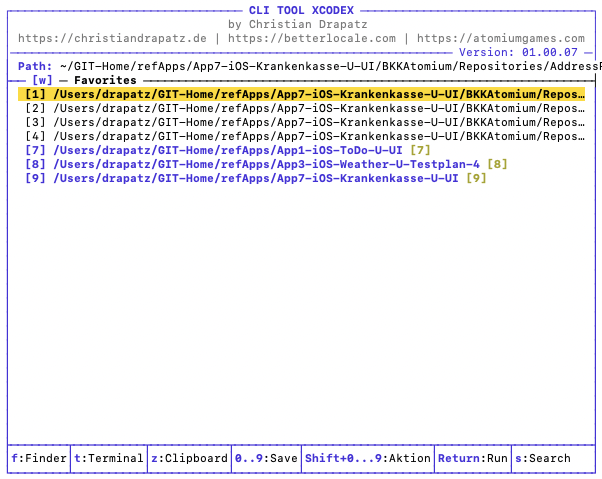
Verzeichnisse als Favoriten speichern und direkt per Ziffer aufrufen
Suche
Die integrierte Suche durchsucht das aktuelle Verzeichnis inklusive aller Unterordner. Wildcards wie * werden unterstützt, sodass du flexibel nach Dateinamen filtern kannst. Die Treffer werden inklusive vollständigem Pfad angezeigt und lassen sich direkt öffnen.
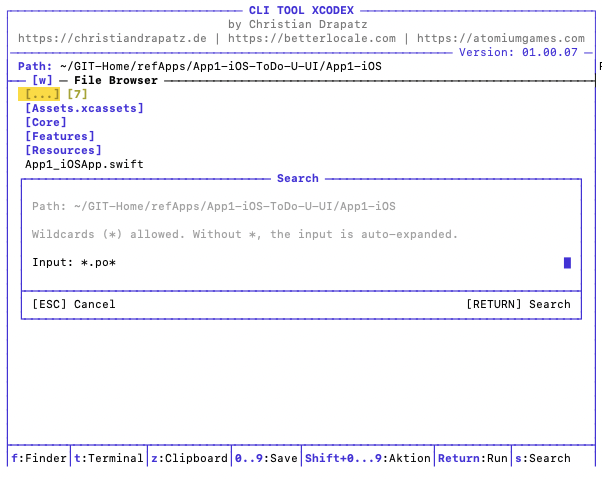
Verzeichnissuche: Suchbegriff eingeben
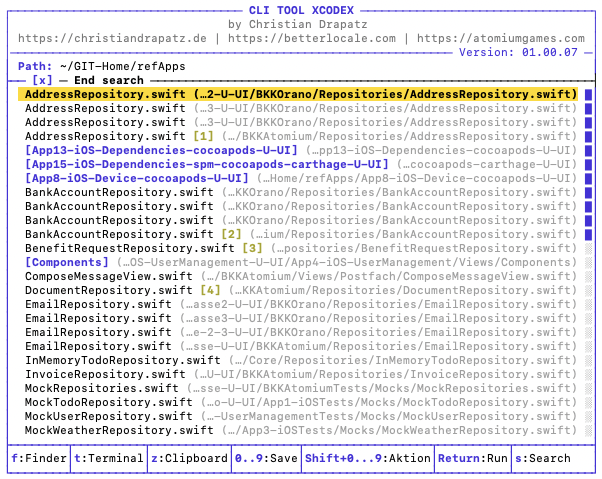
Suchergebnisse: direkte Navigation zu gefundenen Verzeichnissen
Filter
Mit Filtern kannst du gezielt bestimmte Dateitypen anzeigen, zum Beispiel Xcode-Projektdateien oder JSON-Dateien. Auch hier bekommst du eine übersichtliche Liste mit Pfadangaben und kannst die gewünschten Dateien sofort öffnen.
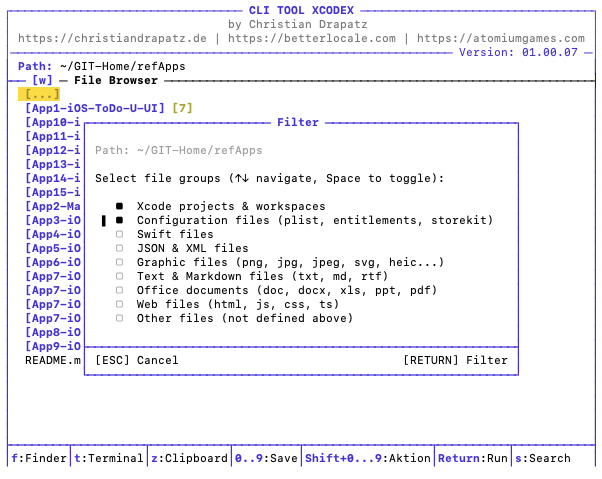
Filter: Dateiliste nach Begriff einschränken
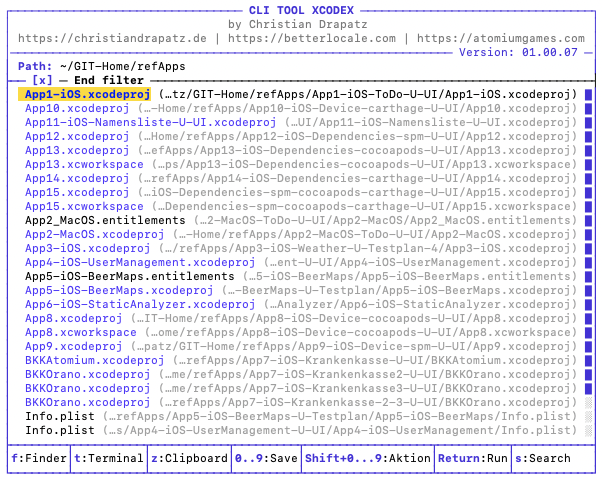
Gefilterte Verzeichnisansicht — nur passende Einträge werden angezeigt
Schnellzugriff
- Pfad kopieren (Z) — Kopiert den absoluten Pfad in die Zwischenablage. Nützlich für externe Tools wie Claude Code.
- In Finder oder Terminal öffnen (W) — Öffnet das aktuelle Verzeichnis direkt. Ideal für die Weiterarbeit mit Claude Code.
- Datei öffnen (Return) — Öffnet Xcode-Projekte, Office-Dateien oder andere Formate sofort mit dem passenden Programm.
Diese kleinen Funktionen sparen Zeit und unterstützen dich im Alltag, ohne den Flow zu unterbrechen.
21. Häufige Probleme
Kein Schema gefunden
Das Arbeitsverzeichnis ist nicht korrekt gesetzt oder die .xcworkspace/.xcodeproj-Datei liegt nicht im aktuellen Verzeichnis. xcodex aus dem Projekt-Root starten.
Simulator nicht verfügbar
Xcode neu öffnen und die gewünschten Simulator-Plattformen installieren. Anschließend xcodex neu starten — die Geräteliste wird automatisch aktualisiert.
Build schlägt fehl
Fehlermeldung und betroffene Datei aus der roten Ausgabe entnehmen. Bei unerklärlichen Fehlern zuerst DerivedData löschen (Clean & Cache) und dann erneut bauen.
Xcode Command Line Tools fehlen
xcode-select --install
Nach der Installation Terminal neu starten.
Push Notification funktioniert nicht
Die App muss Push Notifications im entitlements-File aktiviert haben und korrekt im Apple Developer Portal registriert sein. Im Simulator werden Notifications auch ohne APNs-Zertifikat unterstützt.
Rechteproblem beim Starten
xcodex ist nicht ausführbar. Lösung:
chmod +x /pfad/zu/xcodex
„missing module"-Fehler nach Branch-Wechsel
Abhängigkeiten nach dem Branch-Wechsel neu auflösen: Build & Run → Alle Dependencies auflösen.
22. Tipps für den Alltag
| Tipp | Erklärung |
|---|---|
| Alias verwenden | xcodex in ~/.zshrc einrichten, damit der Befehl aus jedem Verzeichnis funktioniert |
| Aus dem Projektverzeichnis starten | xcodex erkennt die Projektdatei automatisch, wenn es im Root-Verzeichnis des Projekts gestartet wird |
| Vor Pull Requests | Lokale Builds und Tests ausführen, bevor ein PR erstellt wird — vermeidet fehlschlagende CI-Pipelines |
| Isoliertes DerivedData | xcodex baut in ein isoliertes Verzeichnis, sodass parallele Xcode-Builds nicht beeinflusst werden |
Nach git pull | Zuerst Dependencies auflösen (Sektion Abhängigkeiten), dann bauen |
| Vor einem Release-Build | Provisioning Profiles prüfen und Simulator-Cache leeren |
| Regelmäßig aktualisieren | git pull im xcodex-Verzeichnis hält das Tool auf dem neuesten Stand |
23. Haftungsausschluss
xcodex ist ein unabhängiges Open-Source-Werkzeug und steht in keiner Verbindung zu Apple Inc. „Xcode" und „TestFlight" sind eingetragene Marken von Apple Inc. Die Nutzung des Tools erfolgt auf eigene Verantwortung. Für Schäden, die aus der Nutzung entstehen, wird keine Haftung übernommen.
← Zurück zur Startseite
Tutorial — xcodex
Step-by-step guide for iOS, iPadOS and macOS developers.
1. What is xcodex?
xcodex is a terminal-based CLI tool for Apple developers. It consolidates the most important Xcode workflows into a single, keyboard-driven interface — without memorizing flags, without context switching, without opening Xcode.
The tool supports iOS, iPadOS and macOS projects and covers the entire development workflow: build, tests, simulator control, device management, archives, TestFlight/App Store delivery, localization, code coverage, crash analysis and project maintenance.
Tutorial as PDF
Download this tutorial as a PDF in the currently selected language — for offline reading, printing or archiving.
Save Tutorial as PDFDownload xcodex
Download the notarized xcodex.zip directly — no Git clone required. Unzip, set executable permission and launch immediately.
Download xcodex.zip2. Requirements
| Requirement | Notes | Download |
|---|---|---|
| macOS 13 Ventura+ | macOS only | — |
| Xcode | Full install from the Mac App Store (~30 GB). Open once to install components | App Store ↗ developer.apple.com ↗ |
| Command Line Tools | Includes Git, xcodebuild, clang, make, svn | Download ↗xcode-select --install |
| Swift 5.9+ | Included with Xcode | — |
| Git | For cloning the repository | — |
| Homebrew (optional) | For CocoaPods and other tools | brew.sh ↗/bin/bash -c "$(curl -fsSL https://raw.githubusercontent.com/Homebrew/install/HEAD/install.sh)" |
| CocoaPods (optional) | Only if your project uses CocoaPods | brew install cocoapods |
| Carthage (optional) | Only if your project uses Carthage | brew install carthage |
| xcbeautify (optional) | For readable build output | brew install xcbeautify |
| xcodes CLI (optional) | For managing Xcode versions | github.com/XcodesOrg/xcodes ↗brew install xcodesorg/made/xcodes |
3. Installation
The following requirements must be met before installation:
| Requirement | Notes | Download |
|---|---|---|
| Xcode | ~30 GB, open once to install components |
App Store ↗ developer.apple.com ↗ |
| Xcode Command Line Tools | Includes Git, xcodebuild, clang, make, svn |
Download ↗xcode-select --install
|
Clone the repository
This command downloads the complete xcodex source code to your Mac. Git creates the directory ~/Developer/xcodex containing all files. Having a Git clone lets you apply future updates with a single git pull — no need to re-download manually.
git clone https://github.com/drapatzc/xcodex.git ~/Developer/xcodexSet executable permission
By default, macOS does not allow running downloaded files as programs. chmod +x grants the operating system permission to execute the xcodex file. This step only needs to be done once after cloning.
chmod +x ~/Developer/xcodex/xcodexSet up shell alias (recommended)
A shell alias lets you run xcodex from any directory without typing the full path. The alias is saved permanently in your shell's configuration file and is available automatically from the next terminal session onward.
echo 'alias xcodex="$HOME/Developer/xcodex/xcodex"' >> ~/.zshrc
source ~/.zshrc
echo 'alias xcodex="$HOME/Developer/xcodex/xcodex"' >> ~/.bash_profile
source ~/.bash_profilealias xcodex="$HOME/Developer/xcodex/xcodex"
funcsave xcodexecho $SHELL in your terminal. The output shows the path to your active shell — e.g. /bin/zsh, /bin/bash, or /usr/local/bin/fish.
Run
Navigate to your Xcode project's root directory and launch xcodex. On first launch you need to manually select your project or workspace so xcodex has all the information it needs — scheme, device and build configuration. Only then can xcodex correctly build and test your app.
cd YourXcodeProject
xcodex
Update
git pull downloads the latest changes from the repository and applies them to your local copy. This keeps xcodex up to date without needing to clone it again.
cd ~/Developer/xcodex
git pull
Download xcodex directly
You can also download the notarized xcodex.zip directly — no Git clone required. Download the ZIP file, unzip it and place the binary in a fixed path (e.g. ~/Developer/xcodex/). Then only follow steps 2 to 4: set executable permission, configure the shell alias and run xcodex. Updates need to be applied manually by re-downloading.
4. The Menu Interface
The interface is split into two panes: command groups on the left, actions on the right. Navigation is entirely keyboard-driven.
Split-pane interface: command groups on the left, actions on the right
| Key | Action |
|---|---|
| ↑ / ↓ | Navigate within the active pane |
| ← / → | Switch between groups and actions |
| ↵ | Execute the selected action |
| H | Show context-sensitive help for the current action |
| X | Return to menu |
| Shift+Q | Quit the application |
| 1–9 | Direct access to hotkeys in the bottom bar |
| Shift+<Letter> | Jump directly to a command group |
| L | Toggle interface language |
| Space | Switch between XCode view and Browser view |
| Shift+A | Open Browser view in the current working directory |
| Shift+W | Jump directly to Browser view |
All settings persist automatically between sessions.
| Hotkey | Command | Description |
|---|---|---|
| 1 | Delete DerivedData | Removes the project's DerivedData folder and forces a clean rebuild |
| 2 | Clear all caches | Clears DerivedData, module cache, and package manager caches (SPM, CocoaPods, Carthage) |
| 3 | Build & Run | Builds the app and launches it directly on the active device (simulator, physical device, or Mac) |
| 4 | Quick Reset & Build | Deletes project DerivedData, rebuilds and launches the app — the fastest fix for persistent build errors |
| 5 | Close Xcode | Quits Xcode without losing terminal focus |
| 6 | Open project in Xcode | Opens the active project directly in Xcode |
| 7 | Run unit tests | Starts the unit test run with the configured test scheme |
| 8 | Automated tests | Opens the menu for automated and combined test runs |
| 9 | Update project | Triggers a project update (e.g. re-resolve dependencies) |
5. Getting Started — Project Setup
On first launch from a project directory, xcodex needs to be configured once.
Step by step: select project, scheme, device and build configuration
Step 1 — Select working directory
xcodex automatically searches for Xcode files in the current directory. If none is found, a file browser opens for manual selection.
Step 2 — Select app scheme
The scheme controls what gets built and how it is launched. Optionally select a separate test scheme or test plan — useful when tests are organized in their own target.
Step 3 — Select target device
Available simulators and connected physical devices are automatically detected from the current Xcode installation.
Step 4 — Choose build configuration
- Debug — daily development, with symbols and logs
- Release — App Store builds, with all optimizations enabled
Quick shortcuts in the header
In the main menu, additional single-key shortcuts are active in the header to speed up the configuration flow:
| Key | Function |
|---|---|
| W | Select working directory |
| S | Select app scheme |
| T | Select test target |
| D | Select target device |
| C | Switch build configuration (Debug / Release) |
| B | Show and copy bundle ID |
| L | Toggle interface language (German / English) |
6. XCode View vs. Browser View
xcodex offers two main views you can switch between at any time: the XCode view with all developer tools and the Browser view — a keyboard-driven file browser.
Switch between XCode view and Browser view using the Space key
| Key | Action |
|---|---|
| Space | Switch between XCode view and Browser view |
| Shift+X | Jump directly to XCode view |
| Shift+W | Jump directly to Browser view |
| Shift+A | In XCode view: open Browser view with working directory |
7. Clean & Cache
Xcode stores all build artifacts in a shared DerivedData folder. When builds fail for no apparent reason, the app behaves strangely, or errors appear after a refactoring that don't exist in the code — a targeted cleanup helps.
Clean & Cache: various cleanup options at a glance
| Action | What is cleaned | When to use |
|---|---|---|
| Show all directories | Cache browser with size display and selective deletion | Overview before cleaning |
| Clean build | Compiled artifacts of the current scheme | Small reset before a clean build |
| Delete DerivedData (project) | Project-specific DerivedData folder | Unexplained build failures |
| Delete DerivedData | Entire DerivedData folder | Full build cache reset |
| Delete directories (without package managers) | DerivedData, Xcode caches, Simulator cache | Quick reset without touching package managers |
| Delete directories (with package managers) | + CocoaPods, Carthage and SPM caches | When package manager caches should also be cleaned |
| Delete directories (Safe) | DerivedData, ModuleCache, SwiftPM, Xcode caches, Simulator cache, Logs, Diagnostic Reports | Comprehensive reset — everything Xcode recreates automatically |
| Delete directories (Deep) | Everything from "Safe" + Archives, iOS DeviceSupport, all simulator devices | Persistent issues; recover a lot of storage |
| Delete directories (Complete) | Everything from "Deep" + CocoaPods, Carthage and SPM cache; optional Simulator Runtimes | Maximum storage recovery |
| Delete directories (Restart) | Full reset including SourcePackages for a clean project restart | When everything needs to be rebuilt from scratch |
8. Build & Run
xcodex offers several preconfigured build modes optimized for common development scenarios.
Build & Run: different modes for different situations
| Action | What happens | When to use |
|---|---|---|
| Validate | Checks the project for configuration errors | Before the first build in a new setup |
| Dependencies / Package managers | Resolves SPM, CocoaPods and Carthage dependencies | After cloning or on package errors |
| Project configuration | Shows all build settings for the selected scheme | To diagnose configuration issues |
| Build | Compiles the project without launching | Quick compilation check |
| Build & Run | Builds and launches the app in the simulator or on macOS | Standard development workflow |
| Clean (without package managers) & Build & Run | Deletes DerivedData and Xcode caches, then rebuilds and launches | Build failures caused by cache issues |
| Clean (incl. package managers) & Build & Run | Deletes all caches including package manager caches, then rebuilds and launches | Persistent issues or after package manager changes |
Understanding build output
During the build, xcodex shows each step with its duration. Errors are highlighted in red with the affected file and line number.
Build output: structured, compact, with timing per step
Isolated DerivedData
xcodex builds into its own DerivedData directory, completely separate from Xcode. Both can run simultaneously without interfering with each other.
9. Dependencies
CocoaPods, SPM or Carthage dependencies can be managed directly from xcodex — no terminal experience required.
Dependencies: SPM, CocoaPods and Carthage in one menu
| Package Manager | Command |
|---|---|
| Swift Package Manager | swift package resolve |
| CocoaPods | pod install |
| Carthage | carthage update |
git pull, resolve all dependencies before building — this prevents the most common "missing module" errors after branch switches.
10. Simulator & Physical Devices
Depending on the selected target device, xcodex shows either the Simulator group or the Physical Devices group — never both at the same time. The available actions automatically adapt to the active device.
Simulator
Simulators can fall into an inconsistent state — especially after iOS updates or extended uptime. This group restores control.
Simulator: reinstall app, reset, close all instances
| Action | What happens | When to use |
|---|---|---|
| Create new simulator | Choose runtime and device type, create simulator via xcrun simctl create | When a specific device/iOS combination is missing |
| Launch app | Launches the built app on the selected simulator | After a build without rebuilding |
| Launch app on selected simulator | Like "Launch app" but with prior simulator selection | Testing on a different device |
| Uninstall app & fresh test | Uninstalls the app and reinstalls it | Clean start without old app state |
| Restart simulator | Shuts down the simulator and restarts it | For a hanging or unstable simulator |
| Stop simulator | Shuts down the running simulator | Free up resources |
| Reset simulator | Resets the current simulator to factory state | Completely remove app data and settings |
| Show simulator status | All simulators grouped by runtime, color-coded (Booted / Shutdown) | Overview of installed simulators |
| Erase simulator contents | Deletes all content of all simulators (xcrun simctl erase all) | Full reset of all simulator data |
| Delete unavailable simulators | Removes simulators without an installed runtime | Cleanup after Xcode updates |
| Stop all simulators | Stops all running simulators at once | Free up resources, before a build |
| Delete all simulator devices | Removes all simulator device entries (xcrun simctl delete all) | Full restart of simulator infrastructure |
| Delete simulator caches | Removes temporary CoreSimulator caches | Display glitches or behavior after iOS updates |
Remote control the simulator
After the app launches, simulator settings can be changed directly from xcodex — no need to dig through the simulator's own menus.
Controls: Dark Mode, permissions, status bar, push notifications
1. Interaction
| # | Command | Testing value |
|---|---|---|
| 01 | Test push notification | Simulates an APNs payload without a real server — ideal for notification UX tests. |
| 02 | Open deep link | Opens a URL scheme directly, without manually navigating the app. |
2. Appearance
| # | Command | Testing value |
|---|---|---|
| 01 | Toggle Dark / Light Mode | Checks that all assets and colors respond correctly to both modes. |
| 02 | Mock status bar | Sets defined values (time, signal strength) for screenshots and UI tests. |
| 03 | Reset status bar | Restores the status bar mock back to the real system state. |
| 04 | Set Dynamic Type | Tests layout stability at extreme font sizes. |
| 05 | Toggle Bold Text | Checks readability with the bold-text accessibility setting enabled. |
| 06 | Toggle Reduce Motion | Ensures animations are correctly disabled. |
| 07 | Toggle Increase Contrast | Validates contrast ratios for accessibility. |
| 08 | Set Display Zoom (iPhone only) | Tests layout in enlarged display mode. |
| 09 | Toggle Reduce Transparency | Checks UI elements with blur effects disabled. |
| 10 | Toggle On/Off Labels | Ensures toggles are recognisable without colour alone. |
| 11 | Differentiate Without Color | Tests that the app does not rely exclusively on colour to convey information. |
3. Permissions
| # | Command | Testing value |
|---|---|---|
| 01 | Set permissions | Granular control of individual privacy grants. |
| 02 | Reset all app permissions | Resets the app's permission state to "not asked" — for permission-flow tests. |
| 03–19 | Quick Grants (Camera, Microphone, Location, Photos, Contacts, Calendar, Reminders, Motion, Health, Network, Bluetooth, HomeKit, Media Library, Siri, Speech, Local Network, User Tracking) | Grant a single permission in one step — saves dialog clicks on every test run. |
| 20 | Grant all permissions | Sets the entire permission list to "allowed" — for quick tests beyond the permission flow. |
4. Language & Region
| # | Command | Testing value |
|---|---|---|
| 01 | Set app language | Tests app localisation without changing the system language. |
| 02 | Set system language | Tests global language effects (keyboard, system dialogs). |
| 03 | Toggle 24h format | Validates time display in both formats. |
| 04 | Reset system language | Resets all language settings to factory defaults. |
5. Runtime
| # | Command | Testing value |
|---|---|---|
| 01 | Slow Animations | Slows down animations — transition errors become visible. |
| 02 | Highlight Clipped Views | Shows clipped UI elements immediately highlighted in red. |
| 03 | Set Launch Arguments | Injects -argument flags for feature flags and test modes without a build. |
| 04 | Set Env Variables | Passes environment variables to the app on launch. |
| 05 | Simulate Memory Pressure | Tests app behaviour under memory pressure (warning levels). |
| 06 | Test URL Scheme | Opens a deep link and checks the handling. |
| 07 | Core Data Debug | Enables SQL logging for Core Data — shows all queries. |
| 08 | Localization Debug | Enables double length / pseudolanguage — layout problems become immediately visible. |
| 09 | SwiftUI Debug | Shows SwiftUI render boundaries and invalidations in the console. |
| 10 | Background Fetch | Triggers a background fetch manually — without a 20-minute wait. |
| 11 | Background Launch | Launches the app in background mode. |
| 12 | Metal Validation | Enables Metal API validation for GPU code. |
6. Device & System
| # | Command | Testing value |
|---|---|---|
| 01 | Set location | Simulates GPS coordinates without a real location. |
| 02 | Simulate battery status | Tests low-battery warnings and charge-level logic. |
| 03 | Set cellular mode | Simulates EDGE, LTE, 5G or no signal. |
| 04 | Reset IDFA | Resets the advertising ID — for tracking tests. |
| 05 | Trigger iCloud sync | Forces an iCloud sync without waiting. |
| 06 | Set timezone | Tests timezone-sensitive logic (calendar, countdowns). |
| 07 | Mock status bar time | Sets a fixed time for consistent screenshots. |
| 08 | Stop location simulation | Ends the simulated GPS location. |
| 09 | Set Wi-Fi bars | Tests UI at various Wi-Fi signal strengths. |
| 10 | Set cellular bars | Tests UI at various mobile signal strengths. |
| 11 | Set carrier name | Sets a custom carrier name in the status bar. |
| 12 | Stage Manager (iPad only) | Tests the layout in Stage Manager mode. |
| 13 | Set audio route | Switches between speaker, headphones, Bluetooth. |
7. Data
| # | Command | Testing value |
|---|---|---|
| 01 | Add media | Imports photos/videos into the simulator's photo library. |
| 02 | Clear simulator keychain | Removes all stored keychain entries for the app. |
| 03 | Open app data folder | Opens the container directly in Finder — for manual file debugging. |
| 04 | Reset app UserDefaults | Deletes all stored UserDefaults values for the app. |
| 05 | Delete all app data | Removes the entire app container. |
| 06 | Open App Group container | Opens the shared container in Finder. |
| 07 | Show app defaults | Lists all current UserDefaults keys and values. |
| 08 | Open SQLite database | Opens the app's database directly in an external editor. |
| 09 | Show keychain entries | Lists all stored keychain entries for the app. |
| 10 | Install root certificate | Installs a custom CA certificate for SSL pinning tests. |
| 11 | Measure app container | Shows the size of the app container on disk. |
| 12 | Export app container | Exports the container as an archive for offline analysis. |
| 13 | Edit UserDefaults key | Changes individual keys directly — without an app restart. |
8. Logs & Diagnostics
| # | Command | Testing value |
|---|---|---|
| 01 | Stream app logs | Live log output from the app in the console. |
| 02 | Filter console | Filters the system console to relevant subsystems. |
| 03 | Open crash log | Opens the app's most recent crash report. |
| 04 | Create diagnostic report | Creates a full simulator diagnostic report. |
| 05 | Show app version | Shows the bundle version and build number of the installed app. |
| 06 | Stream system logs | Full system console of the simulator. |
| 07 | Validate Privacy Manifest | Checks the PrivacyInfo.xcprivacy for completeness. |
| 08 | SwiftData Debug | Enables SQL logging for SwiftData. |
| 09 | Create sysdiagnose | Creates a full system diagnostic archive. |
9. Live Activities
| # | Command | Testing value |
|---|---|---|
| 01 | Start Live Activity | Starts a Live Activity with a custom payload. |
| 02 | Update Live Activity | Sends an update to a running Live Activity. |
| 03 | End Live Activity | Ends a Live Activity. |
10. WidgetKit
| # | Command | Testing value |
|---|---|---|
| 01 | Reload widget timelines | Forces a timeline refresh without waiting. |
| 02 | Clear widget cache | Clears the internal WidgetKit cache. |
11. App Clips
| # | Command | Testing value |
|---|---|---|
| 01 | Test App Clip URL | Opens an App Clip experience via URL. |
| 02 | Reset App Clip experience | Resets the stored App Clip state. |
Physical Devices
This group controls directly connected iOS devices via USB or Wi-Fi. It is only visible when a physical device is selected as the target.
Full device management for physical iOS devices directly in the terminal
| Action | Description |
|---|---|
| Show all devices | Lists all connected physical devices with name, UDID and iOS version |
| Install App | Installs the last built app bundle on the connected device (device must be unlocked and trusted) |
| Launch App | Launches the installed app on the connected device |
| Terminate app | Terminates the app process on the device without manually operating it |
| Uninstall app | Completely removes the app from the device including all local data |
| List Installed Apps | Displays bundle identifiers and names of all installed apps on the device |
| Live log from device | Streams console output from the device in real time — stop with Ctrl+C |
11. Tests
xcodex separates unit tests and UI tests so the right run can be started for each situation — fast unit tests in the development loop, UI tests before commits or releases.
Tests: unit tests, UI tests and all tests with one action
| Test type | Description |
|---|---|
| Unit Tests | Fast, no simulator launch required |
| UI Tests | Launches the app in the simulator and runs interaction tests |
| All Tests | Combined run |
Result states: ✅ Passed · ⚠️ Skipped · ❌ Failed
Re-run failed tests individually
Failed tests are highlighted in red and can be re-run individually
After a run, xcodex lists all results. Failed tests can be re-run individually — without repeating the entire test suite. Typical workflow:
- Run all tests
- Identify failed tests
- Implement fix
- Re-run only the affected tests
- On success: run full suite to confirm
Code Coverage
The code coverage view shows you directly how well your project is covered by tests. xcodex can run test suites with coverage enabled, evaluate the results and show you which areas are already well tested and where gaps remain. This helps you spot weaknesses early — before they surface in a review, a CI/CD pipeline or a release.
Code coverage per file: quickly identify where tests are missing
| Coverage | Assessment |
|---|---|
| 80–100 % | Well covered — critical paths are tested |
| 50–80 % | Room for improvement, especially for complex logic |
| < 50 % | High risk on changes — tests are missing |
Automated Tests
The automated tests view bundles recurring test runs into a clear terminal workflow. You can run unit tests selectively and test different combinations of scheme, device and configuration. This lets you repeat typical pre-pull-request or pre-release checks faster, without having to reassemble long xcodebuild commands each time.
Automated tests run completely independently of Xcode
Automated tests run fully independently of Xcode — Xcode can be open simultaneously without affecting the test run. Ideal for:
- In parallel with development — tests for feature A while working on feature B
- QA without Xcode knowledge — testers can run test suites independently
- Second clone — test the last commit without touching your own development environment
12. Xcode Integration
This group contains quick-access commands for Xcode itself — for switching between the terminal and the IDE.
Open and close Xcode directly from xcodex
| Action | What happens | When to use |
|---|---|---|
| Tools & versions | Shows installed versions of Xcode, Swift, CocoaPods, SwiftLint and more | Quick overview of the development environment |
| Close Xcode | Quits Xcode | Before cache operations or switching Xcode versions |
| Restart Xcode | Closes Xcode and reopens it | For a hanging Xcode or after settings changes |
| Open Xcode | Opens the current project in Xcode | Quick access without Finder |
| Switch Xcode version | Switches the active Xcode version via xcode-select | When multiple Xcodes are installed and a specific one is needed |
| Install Xcode version | Installs a new Xcode version via Xcodes | Install a new Xcode version alongside the existing one |
| Uninstall Xcode version | Removes an installed Xcode version via Xcodes | Delete old versions and free up storage |
| Open Xcode logs | Opens ~/Library/Logs/Xcode in Finder | For unexplained errors or crashes in Xcode |
| Install Command Line Tools | Starts the macOS system dialog for CLT installation | After a macOS update or on a new Mac |
| Reset Xcode preferences | Deletes com.apple.dt.Xcode.plist after confirmation | For UI freezes or broken keyboard shortcuts in Xcode |
| Reset Xcode user data | Removes ~/Library/Developer/Xcode/UserData/ after confirmation (Keybindings, Themes, Snippets) | When Xcode customizations cause problems |
13. App Store & Distribution
xcodex covers the entire distribution process — from archiving to upload. This saves the manual work in Xcode Organizer and enables uploads directly from the terminal.
App Store: archive, validate and upload in a structured workflow
Prerequisite: App-specific password
For uploads to TestFlight or App Store Connect, xcodex requires an app-specific password:
- Open appleid.apple.com
- Go to Security → App-Specific Passwords
- Create a new password (e.g. "xcodex Upload")
- Enter the password once in xcodex settings
Typical release workflow
Release workflow: validating before upload prevents common submission errors
- Full Reset & Build with Release configuration
- Archive
- Validate — fix errors if any
- Upload to TestFlight — for beta testing
- After approval: submit to App Store
14. Directories
Xcode distributes its data across several nested Library paths. xcodex opens the most important folders with a single keystroke directly in Finder.
Directories: DerivedData, archives, simulators and provisioning profiles in one click
| Action | Path | Content |
|---|---|---|
| Finder → Desktop | ~/Desktop | Desktop files |
| Finder → Downloads | ~/Downloads | Downloads folder |
| Finder → Documents | ~/Documents | Documents |
| Finder → Project folder | current working directory | .xcworkspace / .xcodeproj and project files |
| Finder → DerivedData | ~/Library/Developer/Xcode/DerivedData | Entire DerivedData of all projects |
| Finder → DerivedData/<ProjectName> | ~/Library/Developer/Xcode/DerivedData/<ProjectName>-… | DerivedData of the current project |
| Finder → Build Logs | …/DerivedData/<ProjectName>/Logs/Build | Build logs of the current project |
| Finder → SourcePackages | …/DerivedData/<ProjectName>/SourcePackages | Cloned SPM packages of the current project |
| Finder → Module Cache | ~/Library/Developer/Xcode/DerivedData/ModuleCache.noindex | Pre-compiled module cache |
| Finder → Xcode Caches | ~/Library/Caches/com.apple.dt.Xcode | Xcode's own cache data |
| Finder → Simulators | ~/Library/Developer/CoreSimulator/Devices | All simulator devices and app data |
| Finder → Simulator Cache | ~/Library/Developer/CoreSimulator/Caches | Temporary simulator caches |
| Finder → Archives | ~/Library/Developer/Xcode/Archives | Xcode archives (.xcarchive) |
| Finder → DiagnosticReports | ~/Library/Logs/DiagnosticReports | Crash and diagnostic reports |
| Finder → iOS Device Logs | ~/Library/Logs/CrashReporter | Crash logs from connected devices |
| Finder → Provisioning Profiles | ~/Library/MobileDevice/Provisioning Profiles | Installed provisioning profiles |
15. Localization
Localization errors often only surface at runtime — when the app has already been shipped. xcodex checks the .xcstrings file fully statically, without a build process and without Xcode. Missing keys, duplicate entries and inconsistencies between languages are made immediately visible. This allows localization issues to be caught and fixed during development, before they reach the user.
Localization: missing keys, duplicate keys and consistency check
| Action | What happens | When to use |
|---|---|---|
| Show available languages | Lists all detected language codes from .lproj folders and .xcstrings files | Overview of which languages are present in the project |
| Missing localizations | Shows keys that are completely missing in at least one language | Check before a release whether all languages are complete |
| Unused localizable keys | Shows keys present in localization files but not referenced in code | Clean up outdated or forgotten keys |
| Duplicate translation keys | Finds keys that appear multiple times in the same file | For unexplained translation errors |
| Inconsistent placeholders | Detects keys where placeholders (%@, %d etc.) differ between languages | Prevents crashes from incorrect format arguments |
| Empty translations | Finds keys with an existing but empty entry ("" or whitespace only) | Complements the missing key check — empty values are otherwise overlooked |
| Translation statistics | Shows the translation progress per language as a progress bar from .xcstrings files | Quick overview of how complete each language is |
| Search key / value | Interactive search in .xcstrings by key name or translation value | Quickly find a specific text or key |
| Export XLIFF | Runs xcodebuild -exportLocalizations and places a .xcloc package on the desktop | Create translation packages for external translators |
.xcstrings file directly — no dependency on Xcode or a build process.
16. Apps
The "Apps" command group lets you open frequently used macOS apps directly from the toolbox — no Dock, Spotlight or Finder required. Only apps that are actually installed appear in the list. Apps are launched via their full path, which is more reliable on macOS 26+ than the open -a command.
Open frequently used macOS apps directly from the toolbox
| App | Group | Purpose |
|---|---|---|
| Xcodes | Apple Developer Tools | Manage, install and switch Xcode versions |
| Developer | Apple Developer Tools | Apple Developer Portal and documentation |
| App Store | Apple Developer Tools | Open the App Store |
| TestFlight | Apple Developer Tools | Manage and test beta apps |
| Safari | Apple Developer Tools | Web browser for documentation and research |
| Terminal | System Tools | Command line |
| Console | System Tools | Read system logs and diagnostic messages |
| Activity Monitor | System Tools | Monitor CPU, memory and process usage |
| System Settings | System Tools | macOS settings |
| Passwords | System Tools | Manage macOS passwords and Keychain |
| SF Symbols | System Tools | Browse and copy Apple SF Symbols |
| Fork | Third-party | Git client |
| Insomnia | Third-party | REST and API testing |
| Cyberduck | Third-party | FTP/SFTP/S3 file transfer |
| DevCleaner | Third-party | Clean Xcode caches and developer data |
17. Miscellaneous
Miscellaneous bundles functions that appear less frequently in the daily workflow but can be critical at the right moment. This includes analyzing crash reports, launching Instruments sessions, and managing provisioning profiles. Especially with hard-to-reproduce crashes or build issues right before a release, these tools are invaluable — and accessible directly from xcodex.
Crash reports, Instruments and provisioning profile management
- Analyze Crash Reports — symbolizes
.crashfiles and shows readable stack traces. Requires the matching.dSYMarchive - Instruments (Beta) — starts profiling sessions directly from xcodex
- Manage Provisioning Profiles — lists all local profiles and allows removal of expired ones
Provisioning profiles at a glance
This view shows you all locally available provisioning profiles at a glance. You can see immediately which ones are valid, which app they belong to and where problems exist. This quickly reveals the cause when builds fail locally — without having to click through Xcode.
All local provisioning profiles at a glance — remove expired ones directly
| Column | Information |
|---|---|
| Name | Human-readable profile name |
| App ID | Bundle Identifier the profile applies to |
| Type | Development, AdHoc, App Store, Enterprise |
| Expiry date | When the profile becomes invalid |
| Devices | Number of registered devices (Development/AdHoc) |
18. Isolated Development Environments
This feature clones a repository into a separate directory on disk. Your own development environment remains completely untouched. You can, for example, check out a feature branch in parallel and test it with xcodex — while Xcode continues working on your own branch.
Isolated environments: QA and testers can build and test independently
Workflow
| Step | Description |
|---|---|
| 1. Select | On first launch, a JSON configuration file must be selected (see below). If a file was already loaded, xcodex displays it — you simply confirm whether to keep using it or choose a new one. |
| 2. Clean directory | If the target directory already exists, xcodex asks whether to delete it first. This is useful to start with a clean state. |
| 3. Clone repository | The repository is cloned and placed in the configured target directory. This step can be triggered again at any time via the Initialize command in the main menu. |
| 4. Set working directory | After cloning, xcodex asks whether to use the cloned directory as the working directory. This corresponds to pressing A in the main menu: xcodex locates the Xcode project in the cloned directory and connects it as the active project. |
| 5. Update | With Update, any branch can be selected. All local changes in the temporary directory are discarded — the branch is reset to the latest commit. This allows you to compare and test older versions or other branches. |
| 6. Delete | With Delete, the entire cloned directory is removed. Your own development environment remains untouched. |
Typical use cases
- QA and testers — independently build and test the current develop branch without Xcode knowledge
- Android developers — try out the iOS app in a defined state
- UX designers — quickly launch a feature branch on the simulator
- Code reviews — second clone for testing the review branch without touching your own environment
Configuration file
Since xcodex cannot know which repository to clone or where, you need to create a JSON configuration file in advance and place it anywhere on disk. This file is loaded once via Select and saved — on the next launch it is automatically pre-selected.
| Field | Meaning |
|---|---|
description | Freely chosen name for this configuration — displayed as a label in xcodex |
base | Base directory into which all repositories are cloned (must end with /) |
repositories[].name | Display name of the repository |
repositories[].url | Git URL of the repository (SSH or HTTPS) |
repositories[].destination | Subdirectory within base into which the repository is cloned |
The full path of the cloned repository is: base + destination. In the example below: /Users/username/Downloads/tempApps/refApps/
{
  "description": "ReferenceApps",
  "base": "/Users/username/Downloads/tempApps/",
  "repositories": [
    {
      "name": "ReferenceApps-Repository",
      "url": "git@github.com:example/repo.git",
      "destination": "refApps"
    }
  ]
}
xcodex-env.json) and be stored anywhere on disk. A fixed location such as the home directory or a project folder is recommended so it can be easily found again.
19. Developer Resources
The last command group bundles the most frequently needed documentation and management pages for Apple developers — from Apple Developer Documentation to App Store Connect and the Swift Package Index.
Direct access to Apple documentation, App Store Connect and Swift Package Index
| Resource | Content |
|---|---|
| Apple Developer Documentation | Official documentation for all Apple frameworks and APIs |
| Swift Documentation & Evolution Proposals | Language specification and active language proposals |
| Human Interface Guidelines | Design guidelines for iOS, iPadOS and macOS |
| App Store Connect | App management, TestFlight and sales reports |
| Apple Developer Portal | Certificates, provisioning profiles and devices |
| Swift Package Index | Directory of all Swift packages |
20. Browser View
The Browser view is a fully keyboard-driven file browser directly in xcodex. You navigate through directories, open files, set favorites and perform searches or filters — all without a mouse and without switching context.
Keyboard-driven file browser directly in xcodex
Hotkeys
xcodex is built for fast keyboard control throughout. Common actions can be triggered directly via hotkeys, without navigating through long menus.
| Key | Action |
|---|---|
| Z | Jump to the project working directory |
| 0–9 | Open favorite |
| Shift+0–9 | Save current directory as favorite |
| F | Start search |
| T | Activate filter |
| S | Confirm selection / set directory |
| D | Use selected directory as working directory |
| W | Open in Finder |
Help
The Browser view includes context-sensitive help. Press H to open the help overlay. It shows all available keyboard shortcuts and actions for the current view — clearly laid out and accessible without leaving the Browser view.
Context-sensitive help — all keyboard shortcuts at a glance
Favorites
You can set up to 10 quick-access shortcuts for frequently used directories. Use keys 0–9 to save your favorites and Shift + 0–9 to jump directly to them. Alternatively, press W to switch quickly between the browser and favorites view.
Save directories as favorites and access them directly with a number key
Search
The built-in search scans the current directory including all subdirectories. Wildcards such as * are supported, letting you filter flexibly by filename. Results are shown with the full path and can be opened directly.
Directory search: enter search term
Search results: direct navigation to found directories
Filter
With filters you can display specific file types, for example Xcode project files or JSON files. You get a clear list with path information and can open the desired files immediately.
Filter: narrow the file list by term
Filtered directory view — only matching entries are shown
Quick Access
- Copy path (Z) — Copies the absolute path to the clipboard. Useful for external tools such as Claude Code.
- Open in Finder or Terminal (W) — Opens the current directory directly. Ideal for continuing work with Claude Code.
- Open file (Return) — Opens Xcode projects, Office files or other formats immediately with the appropriate application.
These small features save time and support your daily workflow without interrupting your flow.
21. Common Issues
No scheme found
The working directory is not set correctly or the .xcworkspace/.xcodeproj file is not in the current directory. Launch xcodex from the project root.
Simulator not available
Open Xcode and install the desired simulator platforms. Then restart xcodex — the device list is updated automatically.
Build fails
Take the error message and affected file from the red output. For unexplained errors, delete DerivedData first (Clean & Cache) and then build again.
Xcode Command Line Tools missing
xcode-select --install
Restart the terminal after installation.
Push notification not working
The app must have Push Notifications enabled in the entitlements file and be correctly registered in the Apple Developer Portal. In the simulator, notifications are supported without an APNs certificate.
Permission error on launch
xcodex is not executable. Solution:
chmod +x /path/to/xcodex
"missing module" error after branch switch
Resolve dependencies after the branch switch: Build & Run → Resolve All Dependencies.
22. Everyday Tips
| Tip | Explanation |
|---|---|
| Use an alias | Add xcodex to ~/.zshrc so the command works from any directory |
| Launch from the project directory | xcodex detects the project file automatically when started in the root directory of the project |
| Before pull requests | Run local builds and tests before creating a PR — this avoids failing CI pipelines |
| Use isolated DerivedData | xcodex builds into an isolated directory, so parallel Xcode builds are not affected |
After git pull | Resolve dependencies first (see Dependencies section), then build |
| Before a release build | Check provisioning profiles and clear simulator cache |
| Update regularly | git pull in the xcodex directory keeps the tool up to date |
23. Disclaimer
xcodex is an independent open-source tool and is not affiliated with Apple Inc. "Xcode" and "TestFlight" are registered trademarks of Apple Inc. Use of this tool is at your own risk. No liability is accepted for damages arising from its use.
← Back to homepage